

Jailhouse 是一个基于 Linux 的静态分区管理程序。它能够运行在裸机上,可使用被一个称为“单元”(即:cell)的方式来配置 CPU 和硬件的虚拟化特性,在单元(cell)内部运行的guest OS或裸机应用程序就称为inmate。
Jailhouse 的设计非常简单,一旦激活就运行于裸设备之上,完全控制硬件并且无需外部支持。与其他裸设备管理器相比,它可通过 Linux 系统进行加载和配置,管理接口基于 Linux 架构,因此你需要先启动 Linux 然后启用 Jailhouse 再划分系统资源给额外的单元。NXP的Immersiv3D沉浸式音频方案就是应用了jailhouse虚拟技术。
如下为具体操作过程:
- 启动流程
下图显示了从主板上电到多操作系统启动的工作流程。 Jailhouse依靠Linux OS(另一个引导加载程序)来进行Jailhouse内核的加载和初始化。

- 执行如下步骤来测试或使用jailhouse
- 在U-Boot阶段执行命令run jh_mmcboot 或者 run jh_netboot
- 等待Linux OS 启动完成并用root登录
- 执行命令Insmod /lib/modules/`uname -r`/extra/driver/jailhouse.ko
- 使能jailhouse 执行命令Jailhouse enables /usr/share/jailhouse/cells/ imx8mm.cell
- 然后就进行各种demo测试, 主要有3种,双linux OS 、IVSHMEM和GIC
用户空间jailhouse的使用,可用help查看
root@imx8mmevk:~# jailhouse --help
Usage: jailhouse { COMMAND | --help | --version }

Available commands:
   enable SYSCONFIG
   disable
   console [-f | --follow]
   cell create CELLCONFIG
   cell list
   cell load { ID | [--name] NAME } { IMAGE | { -s | --string } "STRING" }
             [-a | --address ADDRESS] ...
   cell start { ID | [--name] NAME }
   cell shutdown { ID | [--name] NAME }
   cell destroy { ID | [--name] NAME }
   cell linux CELLCONFIG KERNEL [-i | --initrd FILE]
              [-c | --cmdline "STRING"] [-w | --write-params FILE]
   cell stats { ID | [--name] NAME }
   config create [-h] [-g] [-r ROOT] [--mem-inmates MEM_INMATES]
                 [--mem-hv MEM_HV] FILE
   config collect FILE.TAR
   hardware check
命令说明如下:
- Enable:将Jailhouse kernel加载到内存中并完成初始化。
- Console:显示Jailhouse内核日志。
- Cell create:创建一个新的cell。
- Cell list:列出系统中的cell。
- Cell load:将cell image加载到ID或name指定的cell上。
- Cell start:启动一个cell。
- Cell shutdown:关闭cell。
- Cell destroy:销毁一个cell,这个cell所占的资源将被释放。
- Cell stats:显示vmexits_cp15 / hypercall / mmio / psci等的状态。
- Cell Linux:创建/加载/启动一个Linux cell。
一、双linux OS的测试,SD卡启动
执行如下命令
jailhouse cell linux /usr/share/jailhouse/cells/imx8mm-linux-demo.cell /run/media/mmcblk1p1/Image -d /run/media/mmcblk1p1/imx8mm-evk-inmate.dtb -c "clk_ignore_unused console=ttymxc3,115200 earlycon=ec_imx6q,0x30890000,115200 root=/dev/mmcblk2p2 rootwait rw"执行之后,可以看到如下图log: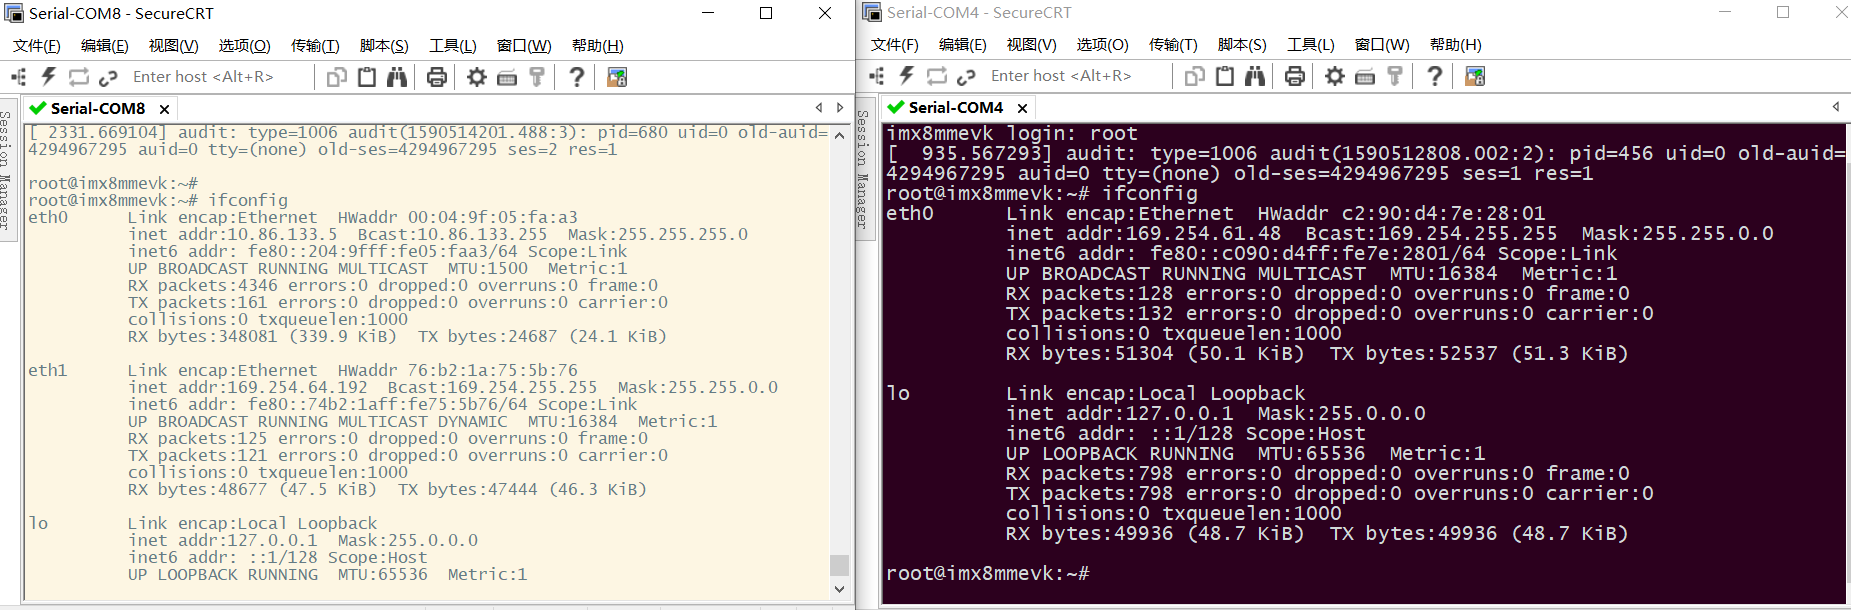
在早期的时候,第二个inmate Linux OS 使用的是第一个linux UART console 输出,之后正常情况下就使用自己的UART console输出,所以要开启另一个UART终端.
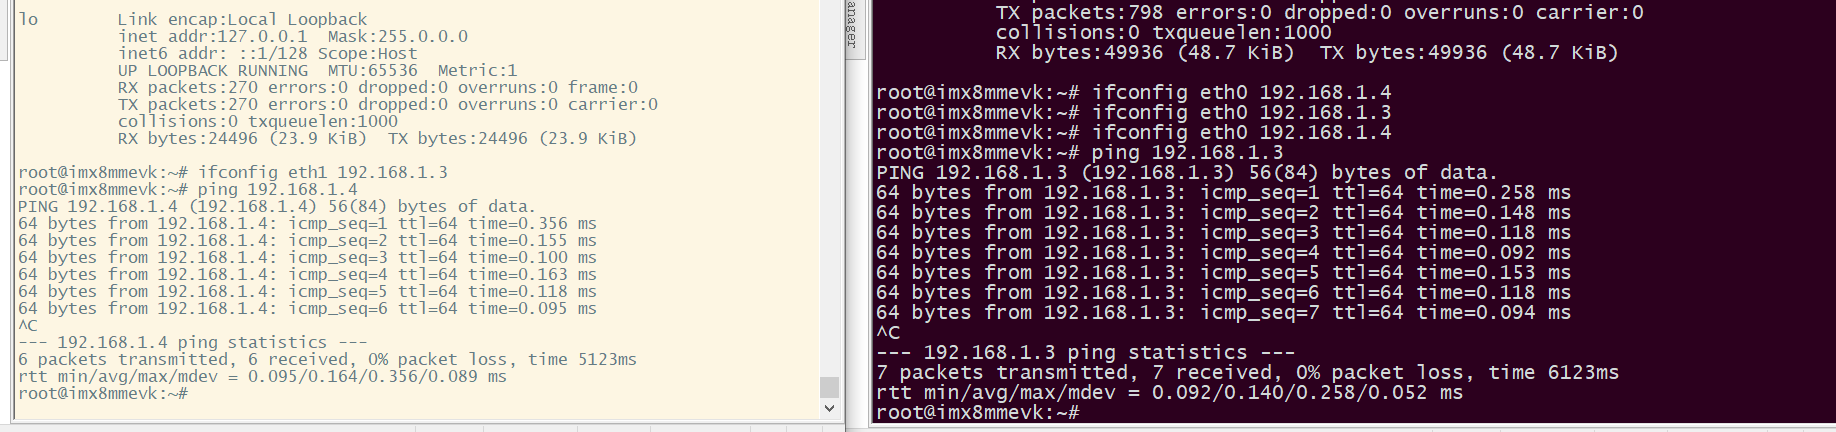
当第二个Inmate Linux启动完成后,在第二个Inmate Linux OS中执行ifconfig eth0 192.168.1.3。 并执行ifconfig eth0 192.168.1.4。然后,您可以使用 ping命令相互ping通。
You could configure the eth1 in root cell and eth0 in inmate cell and ping.
In inmate cell
#ifconfig eth0 192.168.1.4
In root cell
#ifconfig eth1 192.168.1.3
二、IVSHMEM测试
注意:要测试新的demo 要使用jailhouse cell destroy 毁掉之前运行的demo,否则会出错。
- jailhouse cell destroy 1
- jailhouse cell create /usr/share/jailhouse/cells/imx8mm-ivshmem-demo.cell
- jailhouse cell load 1 /usr/share/jailhouse/inmates/ivshmem-demo.bin
- jailhouse cell start 1
//在同一网段的另一PC的终端上 ssh root@10.86.133.5 然后执行第5步
- ivshmem-demo /dev/uio[x] ###[x] normally the last one under your /dev/ directory.
ivshmem-demo /dev/uio0
过程如下:
root@imx8mmevk:~# jailhouse cell destroy 1
JAILHOUSE_CELL_DESTROY: No such file or directory
root@imx8mmevk:~#  jailhouse cell create /usr/share/jailhouse/cells/imx8mm-ivshmem-demo.cell
[ 3861.582023] CPU3: shutdown
[ 3861.584740] psci: CPU3 killed (polled 0 ms)
Adding virtual PCI device 00:00.0 to cell "ivshmem-demo"
Shared memory connection established, peer cells:
 "imx8mm"
Created cell "ivshmem-demo"
Page pool usage after cell creation: mem 75/992, remap 144/131072
[ 3861.609110] Created Jailhouse cell "ivshmem-demo"
root@imx8mmevk:~# jailhouse cell load 1 /usr/share/jailhouse/inmates/ivshmem-demo.bin
Cell "ivshmem-demo" can be loaded
root@imx8mmevk:~# jailhouse cell start 1
Started cell "ivshmem-demo"
IVSHMEM: Found device at 00:00.0
IVSHMEM: bar0 is at 0x00000000ff000000
IVSHMEM: bar1 is at 0x00000000ff001000
IVSHMEM: ID is 1
IVSHMEM: max. peers is 1
IVSHMEM: state table is at 0x00000000bba00000
IVSHMEM: R/W section is at 0x00000000bba01000
IVSHMEM: input sections start at 0x00000000bba0a000
IVSHMEM: output section is at 0x00000000bba0c000
IVSHMEM: initialized device
state[0] = 0
state[1] = 2
state[2] = 0
rw[0] = 0
rw[1] = 0
rw[2] = 0
in@0x0000 = 0
in@0x2000 = 0
in@0x4000 = 0
root@imx8mmevk:~#
IVSHMEM: sending IRQ 0 to peer 2
IVSHMEM: sending IRQ 0 to peer 2
IVSHMEM: sending IRQ 0 to peer 2
IVSHMEM: sending IRQ 0 to peer 2
IVSHMEM: sending IRQ 0 to peer 2
IVSHMEM: got interrupt 0 (#1)
state[0] = 1
state[1] = 2
state[2] = 0
rw[0] = 0
rw[1] = 1
rw[2] = 0
in@0x0000 = 0
in@0x2000 = 10
in@0x4000 = 0
IVSHMEM: sending IRQ 0 to peer 2
IVSHMEM: got interrupt 0 (#2)
state[0] = 1
state[1] = 2
state[2] = 0
rw[0] = 0
rw[1] = 2
rw[2] = 0
in@0x0000 = 0
in@0x2000 = 20
in@0x4000 = 0
IVSHMEM: sending IRQ 0 to peer 2
IVSHMEM: got interrupt 0 (#3)
state[0] = 1
state[1] = 2
state[2] = 0
rw[0] = 0
rw[1] = 3
rw[2] = 0
in@0x0000 = 0
in@0x2000 = 30
in@0x4000 = 0
IVSHMEM: sending IRQ 0 to peer 2
IVSHMEM: got interrupt 0 (#4)
state[0] = 1
state[1] = 2
state[2] = 0
rw[0] = 0
rw[1] = 4
rw[2] = 0
in@0x0000 = 0
in@0x2000 = 40
in@0x4000 = 0
IVSHMEM: sending IRQ 0 to peer 2
IVSHMEM: got interrupt 0 (#5)
state[0] = 1
state[1] = 2
state[2] = 0
rw[0] = 0
rw[1] = 5
rw[2] = 0
in@0x0000 = 0
in@0x2000 = 50
in@0x4000 = 0
IVSHMEM: sending IRQ 0 to peer 2
另一PC的终端:
sac-m@ubuntu01:~$ ssh root@10.86.133.5
root@imx8mmevk:~# ivshmem-demo /dev/uio0
ID = 0
state[0] = 1
state[1] = 2
state[2] = 0
rw[0] = 0
rw[1] = 1
rw[2] = 0
in@0x0000 = 0
in@0x2000 = 10
in@0x4000 = 0

Sending interrupt 0 to peer 1

Sending interrupt 0 to peer 1

Sending interrupt 0 to peer 1

Sending interrupt 0 to peer 1

Sending interrupt 0 to peer 1

Sending interrupt 0 to peer 1

Sending interrupt 0 to peer 1

Sending interrupt 0 to peer 1

Sending interrupt 0 to peer 1

Sending interrupt 0 to peer 1

Sending interrupt 0 to peer 1

Sending interrupt 0 to peer 1

Sending interrupt 0 to peer 1

Sending interrupt 0 to peer 1

Sending interrupt 0 to peer 1

Sending interrupt 0 to peer 1

Sending interrupt 0 to peer 1

Interrupt #1
state[0] = 1
state[1] = 0
state[2] = 0
rw[0] = 1
rw[1] = 18
rw[2] = 0
in@0x0000 = 10
in@0x2000 = 180
in@0x4000 = 0

Sending interrupt 0 to peer 1

Sending interrupt 0 to peer 1

Sending interrupt 0 to peer 1

Sending interrupt 0 to peer 1
三、GIC测试
- jailhouse cell destroy 1
- jailhouse cell create /usr/share/jailhouse/cells/imx8mm-gic-demo.cell
- jailhouse cell load 1 /usr/share/jailhouse/inmates/gic-demo.bin
- jailhouse cell start 1
过程如下:
root@imx8mmevk:~# jailhouse cell create /usr/share/jailhouse/cells/imx8mm-gic-demo.cell
[ 7944.862002] CPU3: shutdown
[ 7944.864719] psci: CPU3 killed (polled 0 ms)
Created cell "gic-demo"
Page pool usage after cell creation: mem 73/992, remap 144/131072
[ 7944.878777] Created Jailhouse cell "gic-demo"
root@imx8mmevk:~#  jailhouse cell load 1 /usr/share/jailhouse/inmates/gic-demo.bin
Cell "gic-demo" can be loaded
root@imx8mmevk:~#  jailhouse cell start 1
Started cell "gic-demo"
Initializing the GIC...
Initializing the timer...
root@imx8mmevk:~# Timer fired, jitter:   2124 ns, min:   2124 ns, max:   2124 ns
Timer fired, jitter:    999 ns, min:    999 ns, max:   2124 ns
Timer fired, jitter:   1124 ns, min:    999 ns, max:   2124 ns
Timer fired, jitter:    874 ns, min:    874 ns, max:   2124 ns
Timer fired, jitter:    999 ns, min:    874 ns, max:   2124 ns
Timer fired, jitter:    874 ns, min:    874 ns, max:   2124 ns
Timer fired, jitter:    999 ns, min:    874 ns, max:   2124 ns
Timer fired, jitter:    874 ns, min:    874 ns, max:   2124 ns
Timer fired, jitter:    874 ns, min:    874 ns, max:   2124 ns
Timer fired, jitter:    999 ns, min:    874 ns, max:   2124 ns
Timer fired, jitter:    999 ns, min:    874 ns, max:   2124 ns
Timer fired, jitter:    874 ns, min:    874 ns, max:   2124 ns
Timer fired, jitter:    874 ns, min:    874 ns, max:   2124 ns
Timer fired, jitter:    999 ns, min:    874 ns, max:   2124 ns
Timer fired, jitter:    999 ns, min:    874 ns, max:   2124 ns
Timer fired, jitter:    999 ns, min:    874 ns, max:   2124 ns
Timer fired, jitter:    999 ns, min:    874 ns, max:   2124 ns
Timer fired, jitter:    874 ns, min:    874 ns, max:   2124 ns
评论