

一. 概述
前几篇文章,说明了如何搭建 Tensorflow Keras 1.x / 2.x / Keras 环境,同时也引入相对应的运算概念并带领各位建立手写辨识系统。接下来,将一步步引导各位,将所建立的手写辨识模组在 i.MX8 的平台实现!! 主要以 i.MX8QM 与 i.MX8M Plus 为主。事不宜迟,启用你的开发板一起动手体验吧!! 如下图所示,为系列博文之示意架构图。此架构图隶属于 i.MX8M Plus 的方案博文中,并属于 eIQ 机器学习开发环境 内的 推理引擎层(Inference Engines Layer) 的子系列 !! 目前章节介绍 “i.MX8 平台实现 !! Tensorflow Lite 手写识别”!!
若新读者欲理解人工智能、机器学习以及深度学习的差异,可点选查阅下方博文
大大通精彩博文 探讨机器学习与深度学习之差异

TFlite 系列博文 - 文章架构示意图 (1)
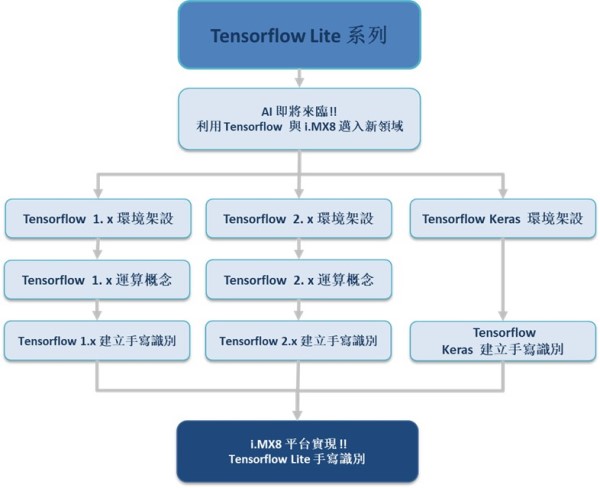
TFlite 系列博文 - 文章架构示意图 (2)
二. NXP i.MX8 手写识别实现
使用搭建环境 : Python 3.6 + Windows 10 + Tensorflow 2.1.0 + Keras 2.3.1
硬体平台环境 : Yocto BSP 5.4.47-2.2.0 + PyeIQ 2.0
本节将拆分为三个步骤介绍,首先第一步介绍如何储存模组、第二步须将模组转成 Tensorflow Lite 的模组格式、第三步建立手写辨识之推理代码并进行实现。
(1) Tensorflow & Keras 模组储存 :
延续 【ATU Book-i.MX8系列 - TFLite】Tensorflow 2. x 建立手写识别 或 Tensorflow Keras 建立手写识别 章节的应用。若尚未查看的读者,请至该文章查看如何建立手写识别模型。
很可惜 !! Tensorflow 1.x 所转换后的模组并非能直接应用于 i.MX8 平台上故暂不介绍。
Tensorflow 2.x 储存模组之方式 :
在训练完成模组后,即可存储模组,并在对应的资料夹下请确认是否储存成功。
tf.saved_model.save(model, "Tensorflow_2_HandWrite") 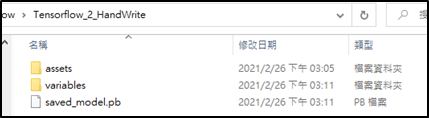
Tensorflow Keras 储存模组之方式 :
在训练完成模组后,即可存储模组,并在对应的资料夹下请确认是否储存成功。
model. save('tf2_keras_handwrite.h5')
(2) Tensorflow Lite 模组转换 :
这里将使用 Tensorflow 2.x 所提供的转换工具 – Tensorflow Lite Convert 来进行模组转换。并建议采用 Python 撰写的方式,而非用指令列工具进行转换,这能够完善优化与最佳化其模组。
Tensorflow 2.x 转 Tensorflow Lite 代码 :
Tensorflow Lite Convert使用方式 : https://www.tensorflow.org/lite/convert?hl=zh-tw
#---------------------------------------------------------------------------------------------------------------
# 转成 Tensorflow Lite
#---------------------------------------------------------------------------------------------------------------
import tensorflow as tf
import numpy as np
def representative_dataset_gen():
for _ in range(250):
yield [np.random.uniform(0.0, 1.0, size=(1, 28, 28, 1)).astype(np.float32)] #需要输入端大小
converter = tf.lite.TFLiteConverter.from_saved_model("Tensorflow_2_HandWrite")
converter.optimizations = [tf.lite.Optimize.DEFAULT]
converter.target_spec.supported_ops = [tf.lite.OpsSet.TFLITE_BUILTINS_INT8]
converter.inference_input_type = tf.uint8
converter.inference_output_type = tf.uint8
converter.representative_dataset = representative_dataset_gen
tflite_model = converter.convert()
with open('tf2_handwrite_model_qunat_uint8.tflite','wb') as f:
f.write(tflite_model)
转换成功后,即会显示以下讯息

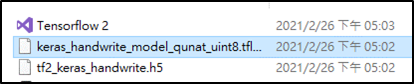
在对应的资料夹下请确认是否转换成功

Tensorflow keras 转 Tensorflow Lite 代码 :
#---------------------------------------------------------------------------------------------------------------
# 转成 Tensorflow Lite
#---------------------------------------------------------------------------------------------------------------
import tensorflow as tf
import numpy as np
def representative_dataset_gen():
    for _ in range(250):
        yield [np.random.uniform(0.0, 1.0, size=(1, 28, 28, 1)).astype(np.float32)] #需要输入端大小

converter = tf.compat.v1.lite.TFLiteConverter.from_keras_model_file('tf2_keras_handwrite.h5')
converter.optimizations = [tf.lite.Optimize.DEFAULT]
converter.target_spec.supported_ops = [tf.lite.OpsSet.TFLITE_BUILTINS_INT8]
converter.inference_input_type  = tf.uint8
converter.inference_output_type = tf.uint8
converter.representative_dataset = representative_dataset_gen
tflite_model = converter.convert()
with open('tf2_handwrite_model_qunat_uint8.tflite','wb') as f:
    f.write(tflite_model)
转换成功后,即会显示以下讯息

在对应的资料夹下请确认是否转换成功
(3) 建立手写辨识之推理代码 :
建立手写辨识之推理代码后,即可尝试运用此代码在 i.MX8 平台上实现手写识别。
建立推理代码 :
import os
import argparse
import cv2
import numpy as np
import sys
import time
import importlib.util
from tflite_runtime.interpreter import Interpreter
from tflite_runtime.interpreter import load_delegate

#取得终端机之输入资讯
def get_cmd():
    parser = argparse.ArgumentParser()
    parser.add_argument('--image', help='path to file image', required=True)
    parser.add_argument('--model', help='Path to tflite model.', required=True)
    return parser.parse_args()

#主要程序
def main():
    args = get_cmd() #读取终端机提供的资讯
    interpreter = Interpreter(args.model)
    interpreter.allocate_tensors() #读取模型架构资讯 Get model graph details
    input_details = interpreter.get_input_details()
    output_details = interpreter.get_output_details()
    width = input_details[0]['shape'][2]
    height = input_details[0]['shape'][1]

    # 读取影像与处理成输入张量
    frame = cv2.imread(args.image)
    image_height,image_width=frame.shape[:2]
    frame_counter = 0
    start = time.time()
    frame_counter += 1
    frame_gray = cv2.cvtColor(frame, cv2.COLOR_BGR2GRAY)
    frame_resized = cv2.resize(frame_gray, (width, height))
    input_data = np.expand_dims(frame_resized, axis=0)
    input_data = np.expand_dims(input_data, axis=3)
    interpreter.set_tensor(input_details[0]['index'], input_data) # set frame as input tensors
    interpreter.invoke()# perform inference

    # 定义输出张量
    classes = interpreter.get_tensor(output_details[0]['index'])[0]
    prob_max_num = np.where(classes==classes.max())[0]
    print(prob_max_num)

if __name__ == "__main__":
    main()
将代码传送至 i.MX8MPLUS 开发板上 :
$ scp example.py root@xx.xx.xx.xx:~
开启 i.MX8MPLUS 开发板运行指令 :
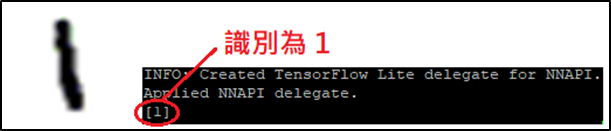
$ python3 tflite_cv.py --image mnist_1.bmp --model tf2_handwrite_model_qunat_uint8.tflite
完整代码连结 : 请点选
三. 结语
经由上述实作,相信各位已经成功的在 i.MX8 的平台上,并执行成功此范例程式且如同预期预测到数字 1 的结果 !! 若是要实作其他模组或应用,仅需要更换模组与输入/输出端方式即可。未来亦可在范例代码加入显示方式,让显示更加完善 !! 换句话说,就是仅需要掌握 Python 与 Tensorflow Lite Runtime 推理引擎这两大重点,即能够灵活应用 !! 未来将介绍更多体验轻量化网路与深度学习的应用介绍!! 敬请期待 !!
四. 参考文件
[1] ITREAD - 从0.1到2.0一文看尽TensorFlow奋斗史
[2] 软体之心 - 包装再升级?Tensorflow 2.0的重大改变
[3] WiKi - Keras开源神经网路库
[4] 科技报橘 - 手机上的轻量版 AI 运算,TensorFlow Lite 问世!
[5] Anaconda - 官方网站
[6] Tensorflow – 官方网站
[7] 深智数位 – Tensorflow 1.x/2.x 完整工程实作
[8] 软体之心 - 包装再升级?Tensorflow 2.0的重大改变
[9] iT1邦帮忙 - Tensorflow 的 Eager Mode
[10] 软体之心 - Keras 手写辨识 MNIST
如有任何相关 Tensorflow Lite 技术问题,欢迎至博文底下留言提问 !!
接下来还会分享更多 Tensorflow Lite 的技术文章 !!敬请期待 【ATU Book-i.MX8 系列 - TFLite】 !!
评论