

一. 概述
在边缘运算的重点技术之中,模组轻量化网路架构 是不可或缺的一环,如何高效的利用硬体资源来达到最佳目标,特别是在效能与准确度的衡量上,是个非常有趣的议题。此章节先探讨深度学习热门的研究项目之一 物件侦测(Object Detection) ,此项目为最初的研究议题,故有衍伸出多种神经网路架构,比如 VGG-19、ResNet、Inception V4、MobileNet + SSD 以及近年相当火红的 yolo 系列皆可实现物件识别之目的,其中差异就是取决于准确度、参数量(模组大小)、运行速度性能等等。
若新读者欲理解更多人工智能、机器学习以及深度学习的资讯,可点选查阅下方博文
大大通精彩博文 【ATU Book-i.MX8系列】博文索引
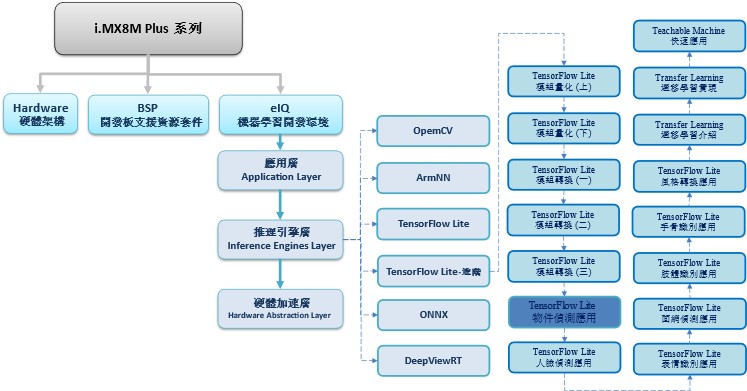
TensorFlow Lite 进阶系列博文-文章架构示意图
二. 算法介绍
由于 边缘运算(edge computing) 需以轻量、快速、准确为主。故采用神经网路架构最轻量,且有一定识别能力、运行效率极佳的 MobileNet + SSD 架构。
神经网路架构探讨 :
(1) MobileNet
核心概念是利用拆分的概念,将原本的卷积层拆成 深度卷积(Depthwise Convolution) 与 逐点卷积(Pointwise Convolution) 两个部分,称作 深层可分离卷积(Depthwise Separable Convolution) 。
以此方式进行运算,能够大幅度减少参数量,以达到加快运算速度。(用途撷取特征)

MobileNet 轻量化概念示意图, 参考 LaptrihnX 网站
(2) Single Shot Multi-Box Detector, SSD
核心概念是由 金字塔特征结构(Pyramidal Feature Hierarchy) 与 先验框(Prior Boxes) 的概念组成。
金字塔特征结构(Pyramidal Feature Hierarchy) :
采用不同大小的特征图检测物件,比如说大特征图检测小物件、小特征图检测大物件。
先验框(Prior Boxes) :
让每个特征图上设置不同尺寸、长宽比的先验框,以作为预测框的基准。这能够帮助训练过程时,提供梯度一定程度的范围限制,能够降低一定程度的训练难度。
如下图所示,金字塔特征结构概念就是在每个不同大小的特征层之中,进行预测来判断是否有物件,并总和每个特征层的结果,找出最大可能性的物件。
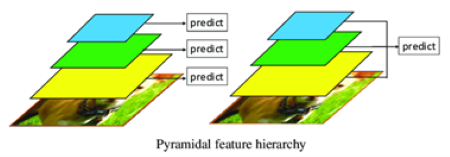
金字塔特征结构(Pyramidal Feature Hierarchy) 示意图, 参考 ResearchGate 网志
如下图所示,为 VGG-19 搭配 SSD 的神经网路架构(Neural Network)。如同上述金字塔特征结构概念,更明确的呈现 SSD 架构的作法。
其实就是在 VGG 每一层的输出都装上 检测器(Detector) 与分类器 (Classifier) ,并将每层结果连结至 Fast NMS 来找最佳的物件检测结果 !!
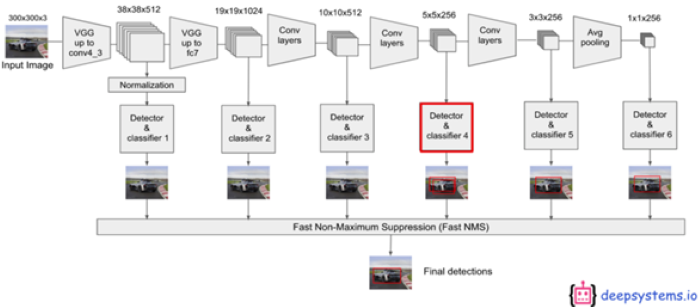
SSD 架构概念示意图, 参考 Medium 网志
换个方式呈现上述概念。如下图所示,说明 SSD 是检测多个物件视窗来找到最佳方案。
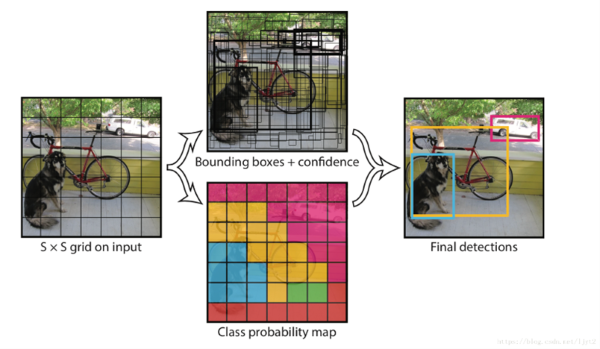
SSD 架构概念示意图 - 2 , 参考 ITREAD 网志
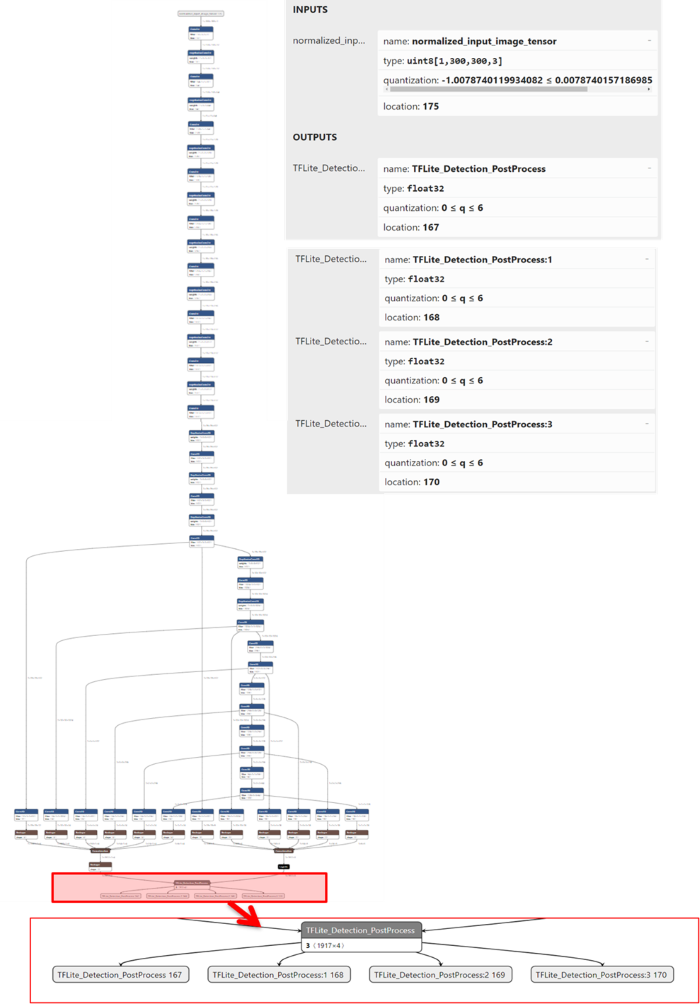
MobileNet SSD 实际架构 ( Netron呈现 ) :
如下图所示,为实际 MobileNet SSD 模组架构。从右侧灰色栏位可看出 Input 与 Output 资讯。
依设计所代表输入端为彩色影像(300x300, RGB)、输出端依序分别为物件位置、种类、分数、数量等资讯。亦可从架构图上看到在最后每个输出层有延伸出 “Pyramidal Feature Hierarchy 结构” 。
三. 算法实现
Google 官方有提供效果极佳的 mobilenet_object_detector.tflite 模组,即可直接使用,请点选下载。
这里本篇文章以 github 的资源,并利用 迁移学习方法 与 TF-Slim 来实现 宫崎骏 《龙猫》 之 TOTORO 物件检测器(Object Detector)。
实现步骤如下:
第一步 : 开启 Colab 设定环境
%tensorflow_version 1.x
!python -c 'import matplotlib as tf; print(tf.__version__)' # Check the version of the tensorflow
※ 由于 colab 已暂停支援 Tensorflow 1.x 的方式,请本机方式实现。
第二步 : TensorFlow Model Garden 下载与安装
%cd root
!git clone https://github.com/tensorflow/models.git
%cd root/models/research/
!protoc object_detection/protos/*.proto --python_out=. # gernate *.proto
!python setup.py build  # 建置 TensorFlow Model Garden 档案
第三步 : TensorFlow Slim 下载与安装
import os
os.environ['PYTHONPATH'] += ':/root/models/research/:/root/models/research/slim/:/root/models/research/object_detection/utils/:/root/models/research/object_detection'
!pip install tf_slim # 安装 TensorFlow  Slim
!python object_detection/builders/model_builder_test.py   # TensorFlow  Slim 模组建立是否成功测试
第四步 : 下载资料库
※ 常见的物件识别的资料库为 COCO DataSets
%cd /root/models/
!git clone https://github.com/fllay/totoro.git #Download TOTORO
第五步 : 数据特征处理
此步骤须将事先把物件的位置特征与分类资讯纪录于 xml 之中,如下图所示与参考 GitHub 网站。
import os
import glob
import pandas as pd
import xml.etree.ElementTree as ET

# 将 xml 档资料转换成 DataFrame 形式
def xml_to_csv(path):
    xml_list = []
    for xml_file in glob.glob(path + '/*.xml'):
        tree = ET.parse(xml_file)
        root = tree.getroot()
        for member in root.findall('object'):
            value = (root.find('filename').text,
                     int(root.find('size')[0].text),
                     int(root.find('size')[1].text),
                     member[0].text,
                     int(member[4][0].text),
                     int(member[4][1].text),
                     int(member[4][2].text),
                     int(member[4][3].text)
                     )
            xml_list.append(value)
    column_name = ['filename', 'width', 'height', 'class', 'xmin', 'ymin', 'xmax', 'ymax']
    xml_df = pd.DataFrame(xml_list, columns=column_name)
    return xml_df

# 将 xml 资料转换成 train_labels.csv 与 test_labels.csv 两个档案
def main():
	image_path = os.path.join(os.getcwd(), 'totoro/images/train')
	xml_df = xml_to_csv(image_path)
	xml_df.to_csv('totoro/data/train_labels.csv', index=None)
	image_path = os.path.join(os.getcwd(), 'totoro/images/test')
	xml_df = xml_to_csv(image_path)
	xml_df.to_csv('totoro/data/test_labels.csv',index=None)

main()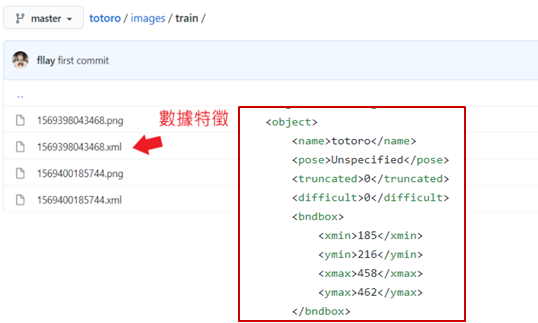
第六步 : 制作 TensorFlow Record
%cd /root/models/totoro/tfrecord
!python generate_tfrecord.py --csv_input=/root/models/totoro/data/train_labels.csv \
  --output_path=train.record --image_dir=/root/models/totoro/images/train
!python generate_tfrecord.py --csv_input=/root/models/totoro/data/test_labels.csv\
  --output_path=test.record --image_dir=/root/models/totoro/images/test
第七步 : 下载训练过的 MobileNet 模组
此步骤利用之前训练过的模组资源重新训练,即 迁移学习(Transfer Learning) 的技术。
%cd ~/models
import shutil
import tarfile
from requests import get
MODEL = 'ssd_mobilenet_v1_coco_2017_11_17'
MODEL_FILE = MODEL + '.tar.gz'
DOWNLOAD_BASE = 'http://download.tensorflow.org/models/object_detection/'
DEST_DIR = 'pretrained_model'
# 下载mobilenet 模组
if not (os.path.exists(MODEL_FILE)):
  with open(MODEL_FILE, "wb") as file:
    response = get(DOWNLOAD_BASE + MODEL_FILE)
    file.write(response.content)

# 解压缩 mobilenet 模组
tar = tarfile.open(MODEL_FILE)
tar.extractall()
tar.close()
os.remove(MODEL_FILE)
if (os.path.exists(DEST_DIR)):
  shutil.rmtree(DEST_DIR)
os.rename(MODEL, DEST_DIR)

# 移动 mobilenet.config" 资讯
shutil.move( "/root/models/research/object_detection/samples/configs/ssd_mobilenet_v1_coco.config",  "/root/models" )
第八步 : 修改 Config 档案
%cd /root/models/research/
# 编辑Pipeline 资讯
import tensorflow as tf
from google.protobuf import text_format
from object_detection.protos import pipeline_pb2
pipeline = pipeline_pb2.TrainEvalPipelineConfig()
config_path = '/root/models/ssd_mobilenet_v1_coco.config'
with tf.gfile.GFile( config_path, "r") as f:
    proto_str = f.read()
    text_format.Merge(proto_str, pipeline)
pipeline.train_input_reader.tf_record_input_reader.input_path[:] = ['/root/models/totoro/tfrecord/train.record'] # train data
pipeline.train_input_reader.label_map_path = '/root/models/totoro/data/object-detection.pbtxt'
pipeline.eval_input_reader[0].tf_record_input_reader.input_path[:] = ['/root/models/totoro/tfrecord/test.record'] # test data
pipeline.eval_input_reader[0].label_map_path = '/root/models/totoro/data/object-detection.pbtxt' # network
pipeline.train_config.fine_tune_checkpoint = '/root/models/pretrained_model/model.ckpt' # weight
pipeline.train_config.num_steps = 500 # training step
pipeline.model.ssd.num_classes = 2 # classes num
pipeline.eval_config.num_examples = 5 # test image number
config_text = text_format.MessageToString(pipeline)
with tf.gfile.Open( config_path, "wb") as f:
    f.write(config_text)
第九步 : 进行训练
!python /root/models/research/object_detection/legacy/train.py \
    --logtostderr \
    --train_dir=/root/models/trained \
    --pipeline_config_path=/root/models/ssd_mobilenet_v1_coco.config
※ 训练完成后,将于 models/trained/ 资料夹内产出 model.ckpt-500 档案
第十步 : 产生 Frozen Graph
此步骤可以调整模组输出大小,比如说将原本输入大小 224x224 改成 96x96 。
!python /root/models/research/object_detection/export_tflite_ssd_graph.py \
    --pipeline_config_path=/root/models/ssd_mobilenet_v1_coco.config \
    --output_directory=/root/models/fine_tuned_model \
    --trained_checkpoint_prefix=/root/models/trained/model.ckpt-500
※ 训练完成后,将于 models/fine_tuned_model / 资料夹内产出 tflite_graph.pb档案
第十一步 : TensorFlow Lite 转换
# 此处以指令方式进行转换,亦可使用上述文章所介绍代码方式。
! tflite_convert \
  --output_file=/root/models/fine_tuned_model/ mobilenetssd_uint8.tflite \
  --graph_def_file=/root/models/fine_tuned_model/tflite_graph.pb \
  --inference_type=QUANTIZED_UINT8 \
  --input_arrays=normalized_input_image_tensor \
  --input_shapes=1,300,300,3 \
  --output_arrays= 'TFLite_Detection_PostProcess','TFLite_Detection_PostProcess:1','TFLite_Detection_PostProcess:2','TFLite_Detection_PostProcess:3’ \
  --default_ranges_min=0 \
  --default_ranges_max=6 \
  --mean_values=128 \
  --std_dev_values=127 \
  --allow_custom_ops
※ 训练完成后,将于 models/fine_tuned_model / 资料夹内产出 mobilenetssd_uint8.tflite档案
第十二步 : Object Detection 范例实现 (于 i.MX8M Plus 撰写运行)
import cv2
import numpy as np
from tflite_runtime.interpreter import Interpreter
# 解析 tensorflow lite 档案
interpreter = Interpreter(model_path='mobilenetssd_uint8.tflite') # 记得将模组移动至 i.MX8 平台
interpreter.allocate_tensors()
input_details = interpreter.get_input_details()
output_details = interpreter.get_output_details()
width = input_details[0]['shape'][2]
height = input_details[0]['shape'][1]
# 读取测试资料,并设置于解译器中
frame = cv2.imread('/root/models/totoro/images/test/image1.jpg')
frame_rgb = cv2.cvtColor(frame, cv2.COLOR_BGR2RGB)
frame_resized = cv2.resize(frame_rgb, (width, height))
input_data = np.expand_dims(frame_resized, axis=0)
interpreter.set_tensor(input_details[0]['index'], input_data)
# 进行推理
interpreter.invoke()
# 取得输出资料
detection_boxes = interpreter.get_tensor(output_details[0]['index']) # 输出位置资讯
detection_classes = interpreter.get_tensor(output_details[1]['index']) # 输出类别资讯
detection_scores = interpreter.get_tensor(output_details[2]['index']) # 输出分数资讯
num_boxes = interpreter.get_tensor(output_details[3]['index'])
# 标示物件
for i in range(10):
  if detection_scores[0, i] > .5: # 预测值大于 0.5则显示
    x = detection_boxes[0, i, [1, 3]] * frame_rgb.shape[1]
    y = detection_boxes[0, i, [0, 2]] * frame_rgb.shape[0]
    class_id = detection_classes[0, i]
    cv2.rectangle(frame_rgb, (x[0], y[0]), (x[1], y[1]), (0, 255, 0), 2)

cv2.imshow('TOTORO',frame_rgb)
cv2.waitKey(0)
cv2.destroyAllWindows()
实现结果 :
如下图所示,成功检测出豆豆龙(物件)。
在 i.MX8M Plus 的 NPU 处理器,推理时间(Inference Time) 约 9 ms。


四. 结语
物件侦测是目前深度学习的一套基础应用,现在主流的算法架构多数为 YOLO 系列为主,并已发展到第七、八代的模组框架。而 MobileNet-SSD 的架构在准确度略输于 YOLO 架构,但仍是轻量化的速度表现上的一个标竿指标。
在 i.MX8MP 的 Vivante VIP8000 NPU 运行,其推理时间可达每秒 8-9 ms 的处理速度,约 125 张 FPS 。此外,搭配本篇做法以及相应的资料库,就能训练出各式各样的物件侦测的应用,像是人脸侦测、手部侦测、水果侦测等等都是以这个概念!!
下篇将结合人脸资料库来实现所谓的 人脸侦测 (Face Detection),敬请期待 !!
五. 参考文件
[1] SSD: Single Shot MultiBox Detector
[2] SSD-Tensorflow
[3] Single Shot MultiBox Detector (SSD) 论文阅读
[4] ssd-mobilenet v1 算法结构及程式码介绍
[5] Get models for TensorFlow Lite
[6] totoro example
[7] MobileNets: Efficient Convolutional Neural Networks for Mobile Vision
如有任何相关 TensorFlow Lite 进阶技术问题,欢迎至博文底下留言提问 !!
接下来还会分享更多 TensorFlow Lite 进阶文章 !!敬请期待 【ATU Book-i.MX8系列 – TFLite 进阶】 !!
评论