

一. 概述
在边缘运算的重点技术之中,模组轻量化网路架构 是不可或缺的一环,如何高效的利用硬体资源来达到最佳目标,特别是在效能与准确度的衡量上,是个非常有趣的议题。此章节再来探讨深度学习热门的研究项目之一 风格转换(Style Transform) ,主要用途是让机器绘画出不同风格的图片,比如说油画、水彩画等等。其中具代表性的神经网路架构为 Fast Style Transfer、Neural Style Transfer、Adaptive Style Transfer、a Arbitrary Style Transfer 等等。而本范例采用所谓的 任意风格转换(Arbitrary Style Transfer) 结合 轻量化网路架构 MobileNet 作应用,后续将介绍算法的基本概念。
若新读者欲理解更多人工智能、机器学习以及深度学习的资讯,可点选查阅下方博文
大大通精彩博文 【ATU Book-i.MX8系列】博文索引
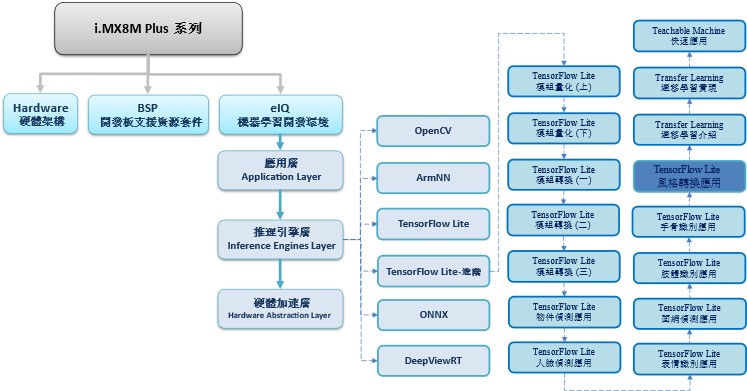
TensorFlow Lite 进阶系列博文-文章架构示意图
二. 算法介绍
MobileNet 神经网路架构探讨 :
核心概念是利用拆分的概念,将原本的卷积层拆成 深度卷积(Depthwise Convolution) 与 逐点卷积(Pointwise Convolution) 两个部分,称作 深层可分离卷积(Depthwise Separable Convolution) 。以此方式进行运算,能够大幅度减少参数量,以达到加快运算速度。(用途撷取特征)
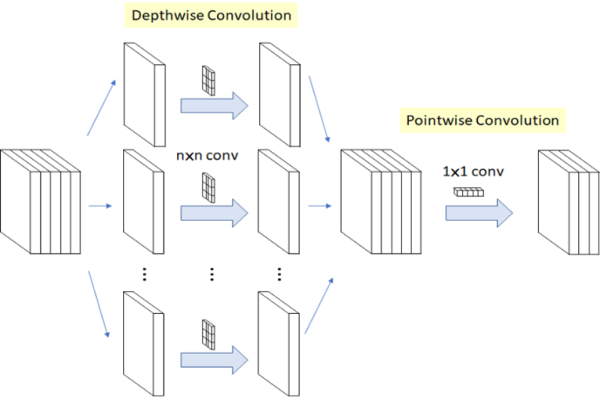
MobileNet 轻量化概念示意图
图文来源 - 参考 LaptrihnX 网站
Arbitrary Style Transfer :
任意风格转换(Arbitrary Style Transfer) 引入 编码器与解码器(Encoder-Decoder) 概念,让机器可以学习任意一张图片的风格进行转换。 如下图所示,具体一点就是拿任意一张图片(image) 给机器(已训练的模组, 或称编码器 Encoder) 学习风格 之后,再拿任意一张图片(content_image) 透过机器(已训练的模组, 或称解码器 decoder) 即可 继承与转换风格 来产生新的图片(stylized_image)。
如下图所示,任意风格转换概念其实就是由 编码器(Encoder) 与 解码器(Decoder) 组成。
编码器(Encoder) : 此称作 Style Prediction Network。主要由 MobileNet 架构来提取特征,并将学到的风格资讯进行编码。
解码器(decoder) : 此称作 Style Transform Network。主要用途为产生影像,并于原神经网路架构的特征层,将风格特征的均值和标准转换至该影像上,来产生新的影像。
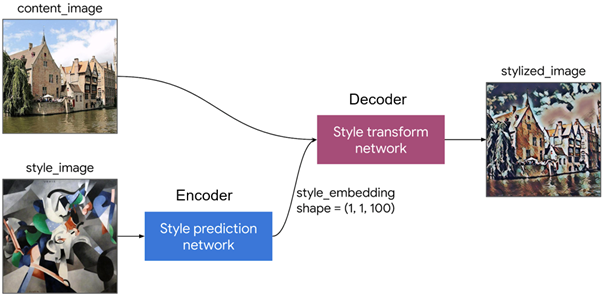
任意风格转换(Arbitrary Style Transfer) 简易概念示意图
图文来源 - 参考 TensorFlow Blog 网站
任意风格转换(Arbitrary Style Transfer) 的另一个重点概念就是 自适应实例标准(Adaptive Instance Normalization, AdaIN) 的转换概念。
如下图所示,编码器与解码器之间存在 AdaIN 转接器。其中 AdaIN 公式的意思可想像成先去风格化 (减去 自身均值u(x) 再除以 自身标准差σ(x) ),再进行添加风格化 (乘 style image 的标准差 σ(y) 再 style image 的加均值u(y) )。
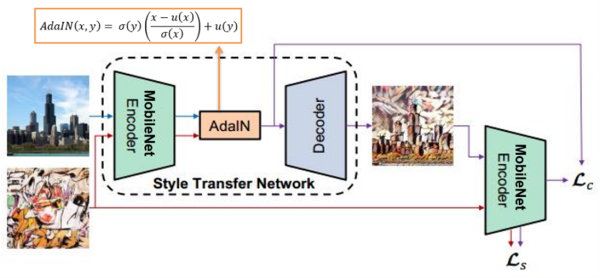
任意风格转换(Arbitrary Style Transfer) 之 AdaIN 概念示意图
图文来源 - 参考 TensorFlow Blog 网站
故编码器、解码器、AdaIN 三大概念就是任意风格转换的基本概念,有兴趣者可参考此连结。
三. 算法实现
Google 官方有提供效果极佳的 magenta_arbitrary-image-stylization.tflite 模组,可查看第六步骤直接下载使用。
故这里利用迁移学习方法与 TF-Slim实现 任意风格转换(Arbitrary Style Transfer)。
实现步骤如下:
第一步 : 开启 Colab 设定环境
%tensorflow_version 1.x
!python -c 'import matplotlib as tf; print(tf.__version__)' # Check the version of the tensorflow
第二步 : Magenta Model 与套件下载与安装
Magenta 是由 Google Brain 团队研究人员所创建,供开发者研究使用。
# 安装必要套件
%cd root
!pip install magenta pytest-pylint
!pip install tensorflow-probability==0.8.0
!pip install gast==0.2.2
!apt-get install build-essential libasound2-dev libjack-dev
# 下载与安装 Magenta Model
!git clone https://github.com/tensorflow/magenta.git
%cd /root/magenta
!sudo apt-get install build-essential libasound2-dev libjack-dev portaudio19-dev
!pip install -e .
!python setup.py test
!python setup.py bdist_wheel --universal
第三步 : TensorFlow Slim 下载与安装
import os
os.environ['PYTHONPATH'] += ':/root/models/research/:/root/models/research/slim/:/root/models/research/object_detection/utils/:/root/models/research/object_detection'
!pip install tf_slim
!python object_detection/builders/model_builder_test.py  # tf-slim 模组建立测试
第四步 : 下载资料库
%cd /root/
!mkdir dataset
%cd /root/dataset
!wget https://www.robots.ox.ac.uk/~vgg/data/dtd/download/dtd-r1.0.1.tar.gz
!tar -xvzf dtd-r1.0.1.tar.gz
!rm dtd-r1.0.1.tar.gz
第五步 : 制作 TensorFlow Record
%cd /root/magenta/magenta/models/image_stylization
STYLE_IMAGES_PATHS="/root/dataset/dtd/images/cobwebbed/cobwebbed_0030.jpg"
RECORDIO_PATH="/root/dataset/dtd_cobwebbed.tfrecord"
!python image_stylization_create_dataset.py \
 --style_files=/root/dataset/dtd/images/cobwebbed/*.jpg \
 --output_file=$RECORDIO_PATH --compute_gram_matrices=False --logtostderr
*** 执行后,将于 /root/dataset 资料夹内产出 dtd_cobwebbed.tfrecord 档案
第六步 : 下载训练过的模组"
此步骤利用之前训练过的模组资源重新训练,即 迁移学习(Transfer Learning) 的技术。
%cd /root
!gdown https://storage.googleapis.com/download.magenta.tensorflow.org/models/arbitrary_style_transfer.tar.gz
!tar -xvzf arbitrary_style_transfer.tar.gz
!rm arbitrary_style_transfer.tar.gz
*** 因 ImageNet 资料库不容易取得,故此小节先以 VGG-16 的 Arbitrary Style Transfer 作范例。
请下载官方现有资源(已训练完成之模组),并可直接进行实作步骤 :
学习风格之 Predict 模型 (编码器) : https://tfhub.dev/google/lite-model/magenta/arbitrary-image-stylization-v1-256/int8/prediction/1?lite-format=tflite
转换风格之 Transfer 模型 (解码器) : https://tfhub.dev/google/lite-model/magenta/arbitrary-image-stylization-v1-256/int8/transfer/1?lite-format=tflite
第七步 : 进行训练
%cd /root/magenta/magenta/models/arbitrary_image_stylization
!arbitrary_image_stylization_train \
      --batch_size=8 \
      --imagenet_data_dir=/root/dataset/train2017 \
      --style_dataset_file=/root/dataset/dtd_cobwebbed.tfrecord \
      --train_dir=/root/trained \
      --content_weights={\"vgg_16/conv3\":2.0} \
      --random_style_image_size=False \
      --augment_style_images=False \
      --center_crop=True \
      --logtostderr
第八步 : 产生Frozen Graph
此步骤可以调整模组输出大小,比如说将原本输入大小 224x224 改成 96x96 。
import tensorflow as tfimport tf_slim as slim
from magenta.models.arbitrary_image_stylization import arbitrary_image_stylization_build_model as build_model
from magenta.models.image_stylization import image_utils
with tf.Graph().as_default(), tf.Session() as sess:
style_img_ph = tf.placeholder(tf.float32, shape=[None, None, 3])
style_img_preprocessed = image_utils.resize_image(style_img_ph, 256)
content_img_ph = tf.placeholder(tf.float32, shape=[None, None, 3])
content_img_preprocessed = image_utils.resize_image(content_img_ph, 256)
stylized_images, _, _, bottleneck_feat = build_model.build_model(content_img_preprocessed, \
style_img_preprocessed, trainable=False, is_training=False, \
inception_end_point='Mixed_6e', style_prediction_bottleneck=100, adds_losses=False)
checkpoint = tf.train.latest_checkpoint("/root/arbitrary_style_transfer/model.ckpt")
init_fn = slim.assign_from_checkpoint_fn(checkpoint, slim.get_variables_to_restore())
sess.run([tf.local_variables_initializer()])
tf.train.write_graph(sess.graph_def, '/root/arbitrary_style_transfer/', 'arbitrary_style_transfer.pbtxt', as_text=True)
tf.train.write_graph(sess.graph_def, '/root/arbitrary_style_transfer/', 'arbitrary_style_transfer.pb', as_text=False)
第九步 : TensorFlow Lite 转换
with tf.Graph().as_default(), tf.Session() as sess:
  style_image_tensor = tf.placeholder(tf.float32, shape=[1, 256, 256, 3], name='style_image')
  content_image_tensor = tf.placeholder(tf.float32, shape=[1, 256, 256, 3], name='content_image')
  stylized_images, _, _, bottleneck_feat = build_model.build_model(content_image_tensor, \
                                     style_image_tensor, trainable=False, is_training=False, \
                                     inception_end_point='Mixed_6e', style_prediction_bottleneck=100, adds_losses=False)
  model_saver = tf.train.Saver(tf.global_variables())
  model_saver.restore(sess, "/root/arbitrary_style_transfer/model.ckpt")
  #(1) predict 学习风格模组
  tf.saved_model.simple_save(sess,"/root/arbitrary_style_transfer/predict",
        inputs={style_image_tensor.name: style_image_tensor},
        outputs={'style_bottleneck': bottleneck_feat})
  #(2) transform 转换风格模组
  tf.saved_model.simple_save(sess,"/root/arbitrary_style_transfer/transform",
        inputs={content_image_tensor.name: content_image_tensor,'style_bottleneck': bottleneck_feat},
        outputs={'stylized_image': stylized_images})
第十步 : TensorFlow Lite 转换 - Predict Model
import tensorflow as tf
import numpy as np
def representative_dataset_gen():
    for _ in range(50):
        yield [np.random.uniform(0.0, 1.0, size=(1, 256, 256, 3)).astype(np.float32)]
converter = tf.compat.v1.lite.TocoConverter.from_saved_model("/root/arbitrary_style_transfer/predict")
converter.optimizations = [tf.lite.Optimize.DEFAULT]
converter.target_spec.supported_ops = [tf.lite.OpsSet.TFLITE_BUILTINS_INT8]
converter.inference_input_type = tf.uint8
converter.inference_output_type = tf.uint8
converter.representative_dataset = representative_dataset_gen
tflite_quant_model = converter.convert()
with open('/root/arbitrary_style_transfer_predict.tflite', 'wb') as w:
    w.write(tflite_quant_model)
第十步 : TensorFlow Lite 转换 - Transform Model
因 ImageNet 资料库不容易取得,故此小节先以 VGG-16 的 Arbitrary Style Transfer 作范例,若欲想自行产出 MobielNet 的 Arbitrary Style Transfer 作范例,仅须依照此 教程 即可!!
import tensorflow as tf
import numpy as np
def representative_dataset_gen():
    for _ in range(50):
        yield [np.random.uniform(0.0, 1.0, size=(1, 256, 256, 3)).astype(np.float32)]
converter = tf.compat.v1.lite.TocoConverter.from_saved_model("/root/arbitrary_style_transfer/ transform ")
converter.optimizations = [tf.lite.Optimize.DEFAULT]
converter.target_spec.supported_ops = [tf.lite.OpsSet.TFLITE_BUILTINS_INT8]
converter.inference_input_type = tf.uint8
converter.inference_output_type = tf.uint8
converter.representative_dataset = representative_dataset_gen
tflite_quant_model = converter.convert()
with open('/root/arbitrary_style_transfer_transform.tflite', 'wb') as w:
    w.write(tflite_quant_model)
第十一步 : Arbitrary Style Transform 范例实现 (于 i.MX8M Plus 撰写运行)
import io
import numpy as np
import cv2
from tflite_runtime.interpreter import Interpreter

# 解析 tensorflow lite 档案 (Prediction)
interpreter_style = Interpreter("magenta_arbitrary-image-stylization-v1-256_int8_prediction.tflite") # 将模组移动至 i.MX8 平台
interpreter_style.allocate_tensors()
style_input_details  = interpreter_style.get_input_details()
style_output_details = interpreter_style.get_output_details()
_, height_predict, width_predict, _ = interpreter_style.get_input_details()[0]['shape']

# 解析 tensorflow lite 档案 (Transfer)
interpreter_transfer = Interpreter("magenta_arbitrary-image-stylization-v1-256_int8_transfer.tflite") # 将模组移动至 i.MX8 平台
interpreter_transfer.allocate_tensors()
transfer_input_details  = interpreter_transfer.get_input_details()
transfer_output_details = interpreter_transfer.get_output_details()
_, height, width, _ = interpreter_transfer.get_input_details()[0]['shape']

# 学习风格
style         = cv2.imread("VanGogh_Star.jpg")
style_rgb     = cv2.cvtColor(style, cv2.COLOR_BGR2RGB)
style_resized = cv2.resize(style_rgb, (width_predict, height_predict))
style_resized = np.expand_dims(style_resized, axis=0)
style_resized = np.array(style_resized, dtype=np.float32)
style_resized = style_resized/255
interpreter_style.set_tensor(style_input_details[0]["index"], style_resized)
interpreter_style.invoke()
style_bottleneck = interpreter_style.get_tensor(style_output_details[0]['index'])

# 载入新图片,开始转换风格
frame         = cv2.imread("belfry.jpg")
frame_rgb     = cv2.cvtColor(frame, cv2.COLOR_BGR2RGB)
frame_resized = cv2.resize(frame_rgb, (width, height))
frame_resized = np.expand_dims(frame_resized, axis=0)
frame_resized = np.array(frame_resized, dtype=np.float32)
frame_resized = frame_resized/255
transfer_input_details = interpreter_transfer.get_input_details()
interpreter_transfer.set_tensor(transfer_input_details[0]["index"], frame_resized)
interpreter_transfer.set_tensor(transfer_input_details[1]["index"], style_bottleneck)
interpreter_transfer.invoke() # 进行转换
stylized_image = interpreter_transfer.get_tensor(transfer_output_details[0]['index']) # 取得转换之结果

# 显示结果
v2.imshow(”StyleTransorm”,frame_rgb)
cv2.waitKey(0)
cv2.destroyAllWindows()
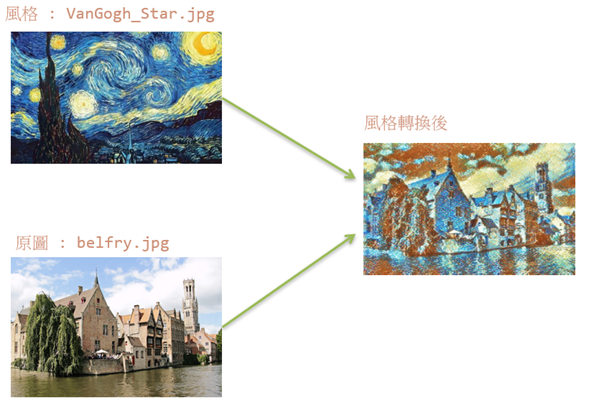
Arbitrary Style Transform 实现结果呈现
如下图所示,成功将图片转换为梵高星空的风格。
在 i.MX8M Plus 的 NPU 处理器,推理时间(Inference Time) 约 1.7 s。

四. 结语
风格转换(Style Transform) 是个不错的应用,可以学习任何一种图片的画风进行转换。比较可惜的是,目前仍未找合适的作法将现有的浮点数模组转换成整数模组,因此运行在 i.MX8MP 的 Vivante VIP8000 NPU,其推理时间可达每帧 1.7 s 的处理速度。下一章节将会介绍机器学习的新颖技术 “迁移学习(Transfer Learning)” ,敬请期待 !!。
五. 参考文件
[1] MobileNets: Efficient Convolutional Neural Networks for Mobile Vision Applications
[2] Arbitrary Style Transfer in Real-time with Adaptive Instance Normalization
[3] Optimizing style transfer to run on mobile with TFLite
[4] 从Style的角度理解Instance Normalization
如有任何相关 TensorFlow Lite 进阶技术问题,欢迎至博文底下留言提问 !!
接下来还会分享更多 TensorFlow Lite 进阶文章 !!敬请期待 【ATU Book-i.MX8系列 – TFLite 进阶】 !!

评论