

一. 概述
在边缘运算的重点技术之中,模组轻量化网路架构 是不可或缺的一环,如何高效的利用硬体资源来达到最佳目标,特别是在效能与准确度的衡量上,是个非常有趣的议题。此章节再来探讨深度学习热门的研究项目之一 人脸关键点侦测(Facial KeyPoints Detection) ,主要用于预测人的脸部特征点位置,可衍伸应用至分析表情、人脸轮廓侦测、人脸替换等等。而具代表性的研究项目为 Dlib、DAN、Facemesh 等等,本范例采用 Google 发布的 FaceMesh 结合 轻量化网路架构 MobileNet 作为应用主轴 ,后续将介绍算法的基本概念。
若新读者欲理解更多人工智能、机器学习以及深度学习的资讯,可点选查阅下方博文
大大通精彩博文 【ATU Book-i.MX8系列】博文索引
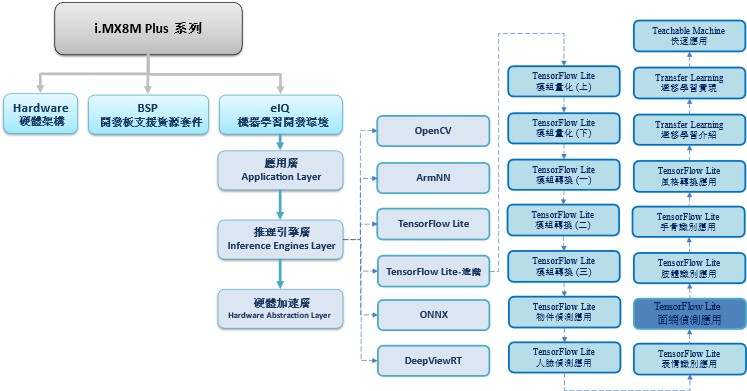
TensorFlow Lite 进阶系列博文-文章架构示意图
二. 算法介绍
神经网路架构探讨 :
人脸关键点侦测并非着重于架构的改变,更重要的是如何运用特征。如下图所示,左侧为 Facial keypoint 的典型做法,以 68 点来描述面部的特征。右侧则是 FaceMesh的新颖做法,以 468 点来描述面部的特征。此外 FaceMesh 也是利用 MobileNet 架构来预测这 468 个特征点的位置资讯。FaceMesh 于一般的 Facial keypoint 概念不同的地方是引入的 3D 特征点,取得原本侦测热图的概念 (可查看后续 Pose Estimation 章节)。故预测后得到参数应为特征点的像素坐标 (x,y),网格重心的深度值为 z ,共三个维度。
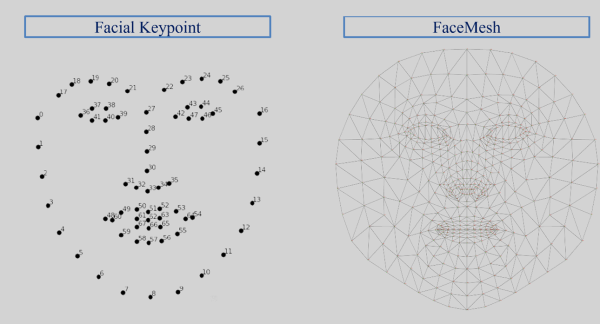
Facial keypoint 与 FaceMesh 特征点概念示意图
图片来源 - MediaPipe
三. 算法实现
Google 官方有提供效果极佳的 facemesh.tflite 模组,故利用 TensorFlow Lite 与 ONNX 的转换,将 MediaPipe 团队提供的模组应用至 i.MX8M Plus 平台来实现所谓的 面网侦测(FaceMesh) 。
范例连结 : https://google.github.io/mediapipe/solutions/face_mesh.html
实现步骤如下:
第一步 : 开启 Colab 设定环境
%tensorflow_version 2.x第二步 : 下载转换套件
! pip install tf2onnx
! pip install onnx-tf
第三步 : 下载 MediaPipe 的 FaceMesh 模组
! cd /root
! git clone https://github.com/google/mediapipe
! cp /root/mediapipe/mediapipe/modules/face_landmark/face_landmark.tflite /root/facemesh.tflite
第四步 : TensorFlow Lite 转为 ONNX 格式
! python -m tf2onnx.convert --opset 9 --tflite /root/facemesh.tflite --output /root/facemesh.onnx第五步 : ONNX 转为 SavedModel 格式
! onnx-tf convert -i /root/facemesh.onnx -o /root/facemesh第六步 : TensorFlow Lite 转换
import tensorflow as tf
import numpy as np
def representative_dataset_gen():
    for _ in range(250):
        yield [np.random.uniform(0.0, 1.0, size=(1, 192, 192, 3)).astype(np.float32)]
converter = tf.lite.TFLiteConverter.from_saved_model("/root/facemesh")
converter.optimizations = [tf.lite.Optimize.DEFAULT]
converter.target_spec.supported_ops = [tf.lite.OpsSet.TFLITE_BUILTINS,tf.lite.OpsSet.SELECT_TF_OPS]
converter.inference_input_type  = tf.uint8
converter.inference_output_type = tf.float32
converter.representative_dataset = representative_dataset_gen
tflite_model = converter.convert()
with open('/root/facemesh_uint8.tflite','wb') as f:
  f.write(tflite_model)
第七步 : FaceMesh 范例实现 (于 i.MX8M Plus 撰写运行)
需搭配人脸侦测找出人脸位置,若相关模型请查看 ”人脸侦测(face Detection) ” 章节
import cv2
import numpy as np
from tflite_runtime.interpreter import Interpreter

# 载入人脸检测器(face detector) ,  解析 tensorflow lite 档案
interpreterFaceExtractor = Interpreter(model_path='mobilenetssd_uint8_face.tflite')
interpreterFaceExtractor.allocate_tensors()
input_details = interpreterFaceExtractor.get_input_details()
output_details = interpreterFaceExtractor.get_output_details()
width = input_details[0]['shape'][2]
height = input_details[0]['shape'][1]
# 载入面网检测器(facemesh detector) , 解析 tensorflow lite 档案
interpreterFaceMesh = Interpreter(model_path='/root/facemesh_uint8.tflite')
interpreterFaceMesh.allocate_tensors()
facemesh_input_details = interpreterFaceMesh.get_input_details()
facemesh_output_details = interpreterFaceMesh.get_output_details()
facemesh_width = facemesh_input_details[0]['shape'][1]
facemesh_height = facemesh_input_details[0]['shape'][2]
# 载入影像资讯,并设置张量 Tensor
frame = cv2.imread("/root/YangMi.jpg")
frame_rgb = cv2.cvtColor(frame, cv2.COLOR_BGR2RGB)
frame_resized = cv2.resize(frame_rgb/255, (width, height))
input_data = np.expand_dims(frame_resized, axis=0)
# 检测出人脸位置资讯
interpreterFaceExtractor.set_tensor(input_details[0]['index'], input_data)
interpreterFaceExtractor.invoke()
detection_boxes = interpreterFaceExtractor.get_tensor(output_details[0]['index'])
detection_classes = interpreterFaceExtractor.get_tensor(output_details[1]['index'])
detection_scores = interpreterFaceExtractor.get_tensor(output_details[2]['index'])
num_boxes = interpreterFaceExtractor.get_tensor(output_details[3]['index'])
# 检测每一个人脸
for i in range(1):
if detection_scores[0, i] > .5:
# 人脸位置
x = detection_boxes[0, i, [1, 3]] * frame_rgb.shape[1]
y = detection_boxes[0, i, [0, 2]] * frame_rgb.shape[0]
y[1] = y[1] + 15 # offset, 因人脸侦测给予的框架之下巴范围过少
cv2.rectangle(frame, (x[0], y[0]), (x[1], y[1]), (0, 255, 0), 2)
# 人脸位置资讯整合
roi_x0 = max(0, np.floor(x[0] + 0.5).astype('int32'))
roi_y0 = max(0, np.floor(y[0] + 0.5).astype('int32'))
roi_x1 = min(frame.shape[1], np.floor(x[1] + 0.5).astype('int32'))
roi_y1 = min(frame.shape[0], np.floor(y[1] + 0.5).astype('int32'))
# 感兴趣区域 (撷取人脸)
roi = frame_rgb[ roi_y0 : roi_y1, roi_x0 : roi_x1, :]
# 设置来源资料至解译器
roi_resized = cv2.resize(roi, (facemesh_width, facemesh_height))
facemesh_input_data = np.expand_dims(roi_resized.astype("uint8"), axis=0)
interpreterFaceMesh.set_tensor(facemesh_input_details[0]['index'], facemesh_input_data)
# 面网侦测
interpreterFaceMesh.invoke()
# 画出面网
mesh = interpreterFaceMesh.get_tensor(facemesh_output_details[1]['index']).reshape(468, 3) # 特征点
size_rate = [roi.shape[1]/facemesh_width, roi.shape[0]/facemesh_height]
for pt in mesh:
x = int(roi_x0 + pt[0]*size_rate[0])
y = int(roi_y0 + pt[1]*size_rate[1])
cv2.circle(frame, ( x ,y ), 1, (0, 0, 255), 1)
cv2.imshow('facemesh',frame)
cv2.waitKey(0)
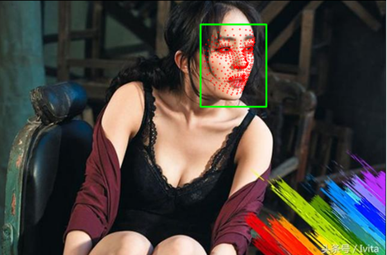
Face mesh 实现结果呈现
如下图所示,成功检测出脸部面网资讯。
在 i.MX8M Plus 的 NPU 处理器 推理时间(Inference Time) 约 2.91 ms。
四. 结语
面网侦测应用 (FaceMesh) 通常需要搭配 人脸侦测(Face Detection) 来作应用。也就是侦测到人脸的位置后,将局部会特征交付给面网侦测模组进行特征提取,才能将准确度应用最大化。最后利用所检测到的 68 个脸部特征点来作后续的判断机制,即可以实现疲劳驾驶或是闭眼、张口检测等等应用。目前运行在 i.MX8MP 的 Vivante VIP8000 NPU,其推理时间可达每秒 2.91 ms 的处理速度,约 330 张 FPS,以及在正面脸部检测时,有不错的检测率 。由于此范例属于复合式的应用,故实际花费时间应该为人脸与面网侦测的花费时间,粗估计算为 10 ms + N * ( 3 ms ) ,其中 N 为侦测到的人脸数量。下一章节将会介绍热门应用之一的 “肢体识别(Pose Estimation)” ,敬请期待 !!。
五. 参考文件
[1] SSD: Single Shot MultiBox Detector
[2] SSD-Tensorflow
[3] Single Shot MultiBox Detector (SSD) 论文阅读
[4] ssd-mobilenet v1 算法结构及程式码介绍
[5] Get models for TensorFlow Lite
[6] widerface-to-tfrecord
[7] Real-time Facial Surface Geometry from Monocular Video on Mobile GPUs
[8] MobileNets: Efficient Convolutional Neural Networks for Mobile Vision
[9] MediaPipe Face Mesh
如有任何相关 TensorFlow Lite 进阶技术问题,欢迎至博文底下留言提问 !!
接下来还会分享更多 TensorFlow Lite 进阶文章 !!敬请期待 【ATU Book-i.MX8系列 – TFLite 进阶】 !!

评论