

一. 概述
在边缘运算的重点技术之中,模组轻量化网路架构 是不可或缺的一环,如何高效的利用硬体资源来达到最佳目标,特别是在效能与准确度的衡量上,是个非常有趣的议题。此章节再来探讨深度学习热门的研究项目之一 姿态估计(Pose Estimation) ,主要用途相当广泛,像是跳舞与健身动作的监控、动画制作等等。其中具代表性的神经网路架构或研究项目为 PoseNet、OpenPose、DensePose 等等,皆可以预测单人与多人姿态、动作。本范例将探讨由 Google 发布的 PoseNet,其中结合了神经网路架构最轻量,运行效率极佳的 MobileNet V1 架构。故此为 轻量化网路架构 MobileNet 与 姿态估计(PoseNet) 组成之应用。。
若新读者欲理解更多人工智能、机器学习以及深度学习的资讯,可点选查阅下方博文
大大通精彩博文 【ATU Book-i.MX8系列】博文索引
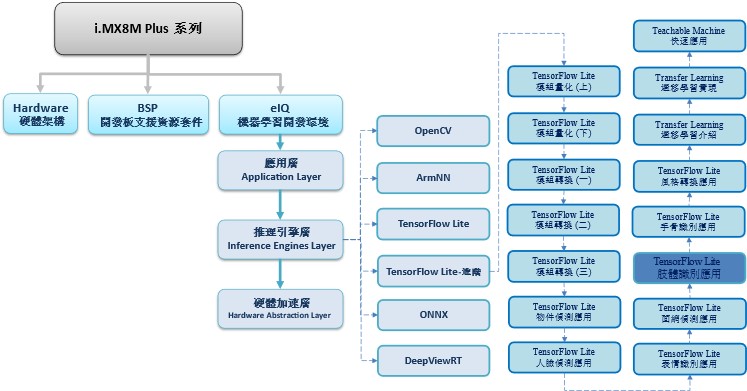
TensorFlow Lite 进阶系列博文-文章架构示意图
二. 算法介绍
神经网路架构探讨 :
姿态估计的实现并非着重于架构的改变,更重要的是如何运用特征。如下图所示,为 PoseNet 所运用的 17 个特征点(key point) ; 分别为眼睛、耳朵、肩膀、手肘、手腕、臀部、膝盖、脚踝。简单来说,就是以 MobileNet 架构去预测这 17 个特征点的位置资讯。
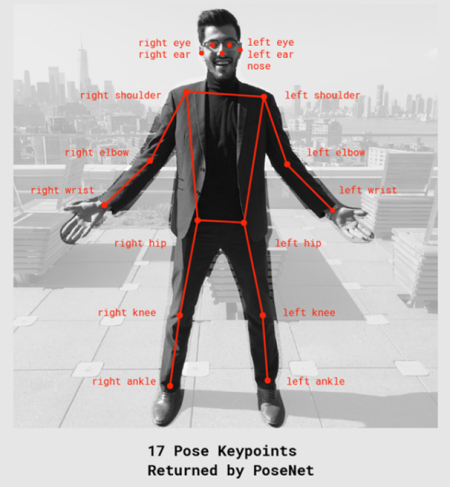
姿态估计(Pose Estimation) 特征点示意图
图文来源 - Medium 网站
姿态估计概念是由 热图(keypoint heatmap) 与 偏移向量(offset vector) 两大构成,如下图所示。
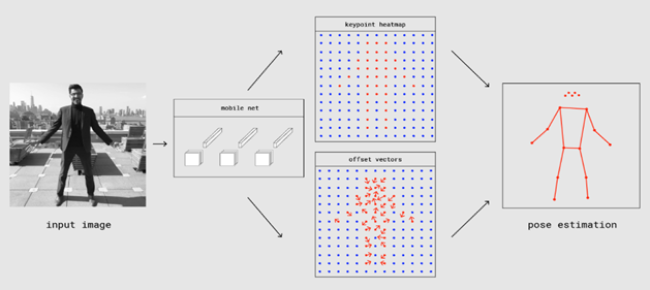
姿态估计(Pose Estimation) 概念示意图
图文来源 - Medium 网站
所谓的 …
热图(keypoint heatmap) : 表示17个特征点的所在位置,其输出资讯为 M x N x 17。
偏移向量(offset vector) : 表示17个特征点的偏移量,其输出资讯为 M x N x 34,共 34 维度资讯,
前17个为 x 方向资讯,后 17 个为 y 方向资讯。
以影像大小 224x224 ,步幅 16 作为输入的话。透过神经网路推理后,将会得到 14x14x17 的热图 与 14x14x34 的偏移向量资讯。每一个维度将各自代表对应的特征(眼睛、耳朵、肩膀..等),比如在第 10 维度时所代表是手肘位置的资讯与偏移量,如下图所示。
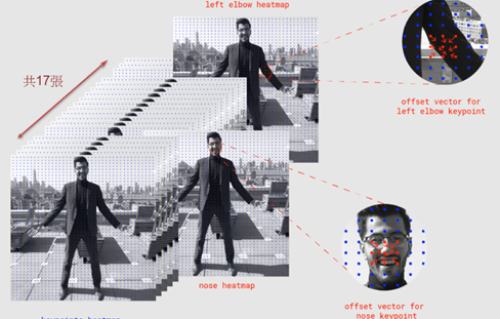
姿态估计(Pose Estimation) 概念示意图 - 2
图文来源 - Medium 网站
那如何判断特征点的资讯是不是为人??
如下图所示,判断是否为 人(Person) 的条件,是以每个 特征点的信心度(Condidence) 作为分数。并加总平均求得,所谓的人体信心度(Person Confidence)。

姿态估计(Pose Estimation) 之信心度概念示意图
图文来源 - Medium 网站
顺带一提,刚刚叙述到的 步幅(Outout Stride) 大小,将会直接影响到准确度(accuacy)、执行速度(speed) 以及输出的资讯量大小。
如下图所示,表示说步幅越小的话,输出的资讯量越大、推理时间拉长、但获得预测效果却越精准。反之则是预测越不准确,但执行效率越来越快。
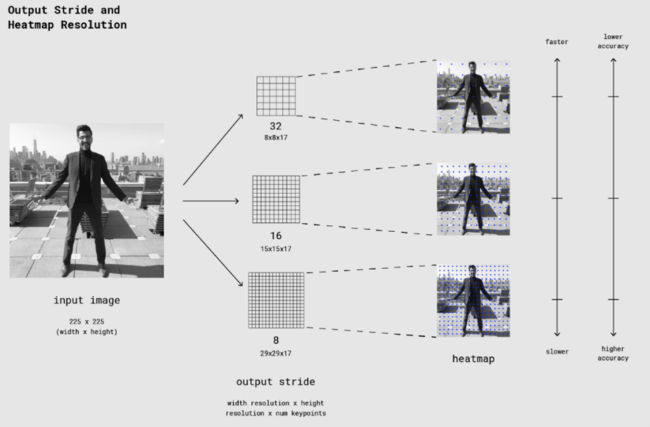
姿态估计(Pose Estimation) 之步幅概念示意图
图文来源 - Medium 网站
延续上述话题,当检测影像大小过小或是输出步幅过大时,将会发现特征点的准确度会下降。如下图所示,测试影像越小时,则 热图(heatmap) 上绿色点分布就越模糊。

热图与准确度之实际图片呈现
图文来源 - github 网站
另外偏移向量的部分,亦可利用实际图片来呈现。如下图所示,第一行的影像为 x 偏移的呈现、第二行的影像为 y 偏移的呈现。同样是观察绿色的深浅,颜色越呈绿色表示偏移动量越大。
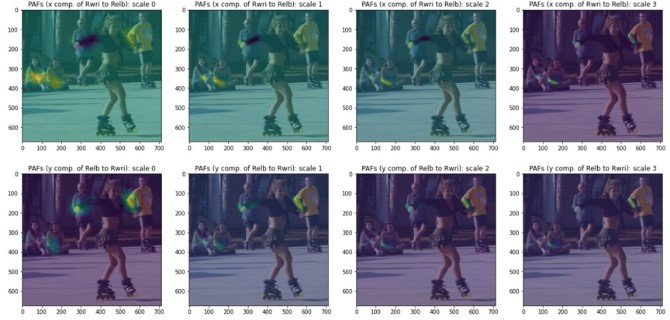
偏移向量与准确度之实际图片呈现
图文来源 - github 网站
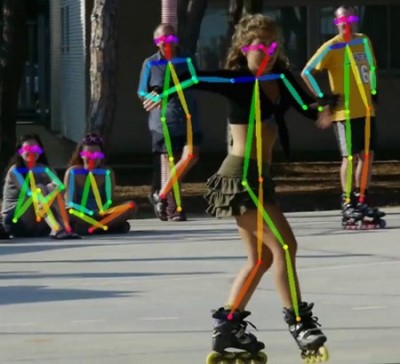
最后一步,将各特征点资讯串连起来就可以构成人体的姿体动作(多人),如下图所示!!
三. 算法实现
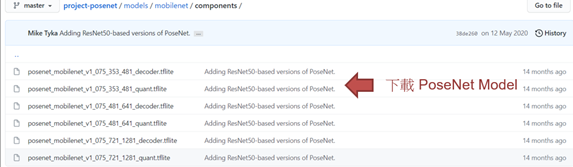
Google 官方有提供效果极佳的 posenet_mobilenet_v1_075_353_481_quant.tflite 模组,可直接下载使用。因测试许多范例应用 (如 PoseEstimationForMobile、TensorFlow J.S to TensorFlow Lite、keras Realtime Multi-Person PoseEstimation 等等),最后实现的效益都不大。故此小节,选择不进行训练或迁移学习,直接套用官方现有资源来实现应用。
实现步骤如下 :
第一步 : 下载官方现有模组
第二步 : Pose Estimation 范例实现 (于 i.MX8M Plus 撰写运行)
此步骤,所运用的输出资讯比较复杂,故代码较为冗长。
import cv2
import numpy as np
import math
from enum import Enum
from tflite_runtime.interpreter import Interpreter

# 解析 tensorflow lite 档案
interpreterPoseEstimation = Interpreter(model_path='posenet_mobilenet_v1_075_353_451_quant.tflite')
interpreterPoseEstimation.allocate_tensors()
input_details = interpreterPoseEstimation.get_input_details()
output_details = interpreterPoseEstimation.get_output_details()
width = input_details[0]['shape'][2]
height = input_details[0]['shape'][1]

# 定义类别 – 人体的相关资讯
class Person:
  def __init__(self):
      self.keyPoints = []
      self.score = 0.0

# 定义类别- 位置资讯
class Position:
  def __init__(self):
    self.x = 0
    self.y = 0

# 定义类别- 身体特征资讯(眼、眉毛、手腕等等)
class BodyPart(Enum):
NOSE = 0,
LEFT_EYE = 1,
RIGHT_EYE = 2,
LEFT_EAR = 3,
RIGHT_EAR = 4,
LEFT_SHOULDER = 5,
RIGHT_SHOULDER = 6,
LEFT_ELBOW = 7,
RIGHT_ELBOW = 8,
LEFT_WRIST = 9,
RIGHT_WRIST = 10,
LEFT_HIP = 11,
RIGHT_HIP = 12,
LEFT_KNEE = 13,
RIGHT_KNEE = 14,
LEFT_ANKLE = 15,
RIGHT_ANKLE = 16,
# 定义类别- 单一特征点资讯
class KeyPoint:
def __init__(self):
self.bodyPart = BodyPart.NOSE
self.position = Position()
self.score = 0.0
# 读取测试资料,并设置于解译器中
frame = cv2.imread("pose_test_image.jpg")
frame_rgb = cv2.cvtColor(frame, cv2.COLOR_BGR2RGB)
frame_resized = cv2.resize(frame_rgb, (width, height))#frame_resized = np.array(frame_resized, dtype=np.float32)
input_data = np.expand_dims(frame_resized, axis=0)
interpreterPoseEstimation.set_tensor(input_details[0]['index'], input_data)
interpreterPoseEstimation.invoke() # 进行推理
# 整理推理后的输出资讯 (heat and offset maps)
# output step 1 : 取得热图与偏移向量
heat_maps = interpreterPoseEstimation.get_tensor(output_details[0]['index'])
offset_maps = interpreterPoseEstimation.get_tensor(output_details[1]['index'])
height_ = heat_maps.shape[1]
width_ = heat_maps.shape[2]
num_key_points = heat_maps.shape[3]
key_point_positions = [[0] * 2 for i in range(num_key_points)] # 特征点位置
# output step 2 : 从 热图(heat_maps) 取得位置资讯
for key_point in range(num_key_points):
max_val = heat_maps[0][0][0][key_point]
max_row = 0
max_col = 0
for row in range(height_):
for col in range(width_):
if heat_maps[0][row][col][key_point] > max_val:
max_val = heat_maps[0][row][col][key_point]
max_row = row
max_col = col
key_point_positions[key_point] = [max_row, max_col]
# output step 3 : 计算信心度(confidence_scores) 与实际位置
x_coords = [0] * num_key_points
y_coords = [0] * num_key_points
confidence_scores = [0] * num_key_points
output step 3 : 计算信心度(confidence_scores) 与实际位置
for i, position in enumerate(key_point_positions):
position_y = int(key_point_positions[i][0])
position_x = int(key_point_positions[i][1])
y_coords[i] = int(position[0])
x_coords[i] = int(position[1])
confidence_scores[i] = (float)(heat_maps[0][position_y][position_x][i] /255)
# output step 4 : 纪录人体分数Person Score、特征点资讯、
person = Person()
key_point_list = []
total_score = 0
for i in range(num_key_points): # 特征点资讯
key_point = KeyPoint()
key_point_list.append(key_point)
for i, body_part in enumerate(BodyPart): # 特征点资讯
key_point_list[i].bodyPart = body_part
key_point_list[i].position.x = x_coords[i]
key_point_list[i].position.y = y_coords[i]
key_point_list[i].score = confidence_scores[i]
total_score += confidence_scores[i]
person.keyPoints = key_point_list # 特征点资讯
person.score = total_score / num_key_points # 人体分数 = 特征点所有分数的平均
body_joints = [[BodyPart.LEFT_WRIST, BodyPart.LEFT_ELBOW],
[BodyPart.LEFT_ELBOW, BodyPart.LEFT_SHOULDER],
[BodyPart.LEFT_SHOULDER, BodyPart.RIGHT_SHOULDER],
[BodyPart.RIGHT_SHOULDER, BodyPart.RIGHT_ELBOW],
[BodyPart.RIGHT_ELBOW, BodyPart.RIGHT_WRIST],
[BodyPart.LEFT_SHOULDER, BodyPart.LEFT_HIP],
[BodyPart.LEFT_HIP, BodyPart.RIGHT_HIP],
[BodyPart.RIGHT_HIP, BodyPart.RIGHT_SHOULDER],
[BodyPart.LEFT_HIP, BodyPart.LEFT_KNEE],
[BodyPart.RIGHT_HIP, BodyPart.RIGHT_KNEE],
[BodyPart.LEFT_KNEE, BodyPart.LEFT_ANKLE],
[BodyPart.RIGHT_KNEE,BodyPart.RIGHT_ANKLE]]
# 将身体的特征部位连线画出 (头部除外)
for line in body_joints:
if person.keyPoints[line[0].value[0]].score > 0.4 and person.keyPoints[line[1].value[0]].score > 0.4:
start_point_x = (int)(person.keyPoints[line[0].value[0]].position.x * frame.shape[1]/width_)
start_point_y = (int)(person.keyPoints[line[0].value[0]].position.y * frame.shape[0]/height_ )
end_point_x = (int)(person.keyPoints[line[1].value[0]].position.x * frame.shape[1]/width_)
end_point_y = (int)(person.keyPoints[line[1].value[0]].position.y * frame.shape[0]/height_ )
cv2.line(frame, (start_point_x, start_point_y) , (end_point_x, end_point_y), (255, 255, 0), 3)
# 画出头部特征点资讯 – 取得左右耳朵、肩膀资讯
left_ear_x = (int)(person.keyPoints[3].position.x * frame.shape[1]/width_)
left_ear_y = (int)(person.keyPoints[3].position.y * frame.shape[0]/height_)
right_ear_x = (int)(person.keyPoints[4].position.x * frame.shape[1]/width_)
right_ear_y = (int)(person.keyPoints[4].position.y * frame.shape[0]/height_)
left_shoulder_x = (int)(person.keyPoints[5].position.x * frame.shape[1]/width_)
left_shoulder_y = (int)(person.keyPoints[5].position.y * frame.shape[0]/height_)
right_shoulder_x = (int)(person.keyPoints[6].position.x * frame.shape[1]/width_)
right_shoulder_y = (int)(person.keyPoints[6].position.y * frame.shape[0]/height_)
# 画出头部特征点资讯 – 计算两耳间与肩膀间重心值
start_point_x = (int) ((left_ear_x + right_ear_x)/2 )
start_point_y = left_ear_y
if(right_ear_y < left_ear_y) : start_point_y = right_ear_y
end_point_x = (int) ((left_shoulder_x + right_shoulder_x)/2 )
end_point_y = left_shoulder_y
if(right_shoulder_y > left_shoulder_y) : end_point_y = right_shoulder_y
cv2.line(frame, (start_point_x, start_point_y) , (end_point_x, end_point_y), (255, 255, 0), 3)
# 显示结果
cv2.imshow(“posenet”,frame)
cv2.waitKey(0)
cv2.destroyAllWindows()
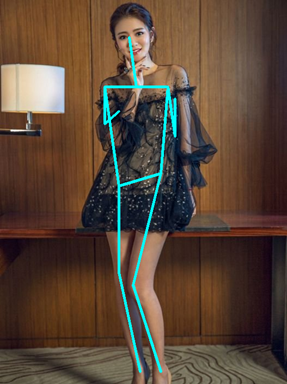
Pose Estimation 实现结果呈现
如下图所示,成功识别出人的姿体动作,并以线段方式画出人的形状。
在 i.MX8M Plus 的 NPU 处理器,推理时间(Inference Time) 约 16 ms。

四. 结语
肢体识别应用(Pose Estimation) 透过所检测到的 17 个人体关节的特征点(如肩膀、手肘、手腕、臀部、膝盖、脚踝等等),能够广泛利用在健身、医疗或是预测路人的行为等等应用。目前运行在 i.MX8MP 的 Vivante VIP8000 NPU,其推理时间可达每帧 16 ms 的处理速度,约 60 张 FPS,以及在单人检测时,有不差的检测率。下一章节将会介绍热门应用之一的 “手骨识别应用(Hand Skeleton Detection)” ,敬请期待 !!
五. 参考文件
[1] SSD: Single Shot MultiBox Detector
[2] SSD-Tensorflow
[3] Single Shot MultiBox Detector (SSD) 论文阅读
[4] ssd-mobilenet v1 算法结构及程式码介绍
[5] Introduction to Camera Pose Estimation with Deep Learning
[6] Towards Accurate Multi-person Pose Estimation in the Wild
[7] Real-time Human Pose Estimation in the Browser with TensorFlow.js
[8] keras_Realtime_Multi-Person_Pose_Estimation
如有任何相关 TensorFlow Lite 进阶技术问题,欢迎至博文底下留言提问 !!
接下来还会分享更多 TensorFlow Lite 进阶文章 !!敬请期待 【ATU Book-i.MX8系列 – TFLite 进阶】 !!

评论