

一. 概述
在边缘运算的重点技术之中,除了 模组轻量化网路架构 与 模组量化 技术之外。另一项技术就是将各家神经网路框架 进行所谓的 模组转换 技术,能帮助开发者快速部属至不同的神经网路框架中。故这里想跟各位读者探讨关于各种模型格式转换为 TensorFlow Lite 的方式,依序分为 TensorFlow 各模组格式转换、 Pytorch 与 ONNX 格式转换、以及 逆转换 TensorFlow Lite 三个章节。
本篇章将介绍 从浮点数的 TensorFlow Lite 格式转换成 SavedModel 格式,再重新量化一次为整数的 TensorFlow Lite 格式,如图下所示。此技术要点参考 @PINTO0309 的 github 文章 。

各模组转换至 TensorFlow Lite 格式示意图
如下图所示,本系列是隶属于 机器学习开发环境 eIQ 之 推理引擎层 (Inference Engines Layer) 中的 TensorFlow Lite 进阶系列,故后续将向读者介绍 “模组转换(三)”
若新读者欲理解更多人工智能、机器学习以及深度学习的资讯,可点选查阅下方博文
大大通精彩博文 【ATU Book-i.MX8系列】博文索引
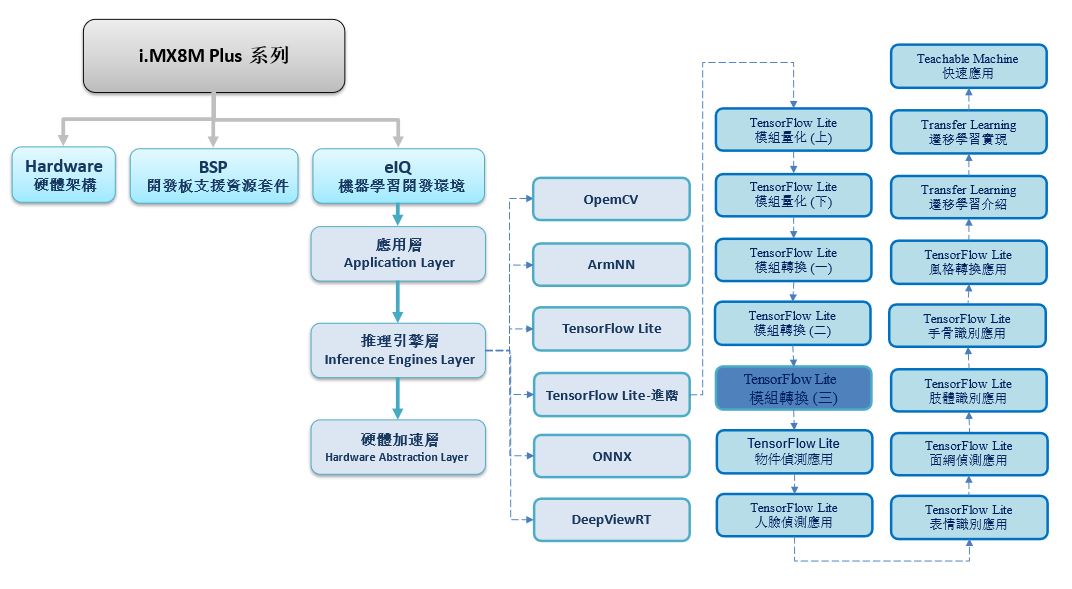
TensorFlow Lite 进阶系列博文-文章架构示意图
二. 模组转换
TensorFlow Lite Inverter 顾名思义就是将 TensorFlow Lite 逆转换回 SavedModel 储存格式。主要目的是将强制将无法取得来源的 tflite 档案进行转换与调用,比如说 TensorFlow Lite 模组经逆转换后,重新借由 SavedModel 转为整数的 TensorFlow Lite 模组。故此技术较为艰难复杂,必须对于 TensorFlow 模组设计须有一定程度的理解 !! 接下来,将以 Google 提供的 MediaPipe API 作解析 !! 有兴趣者可查看 @PINTO 所撰写的文章 !
第一步,安装必要套件
Flatbuffers 套件下载 : https://github.com/google/flatbuffers.git
$ git clone https://github.com/google/flatbuffers.git
$ cd /root/flatbuffers
$ cmake -G "Unix Makefiles"
$ make
MediaPipe 模组下载 : https://github.com/google/mediapipe
$ git clone https://github.com/google/mediapipe
$ cd /root/mediapipe
$ cp mediapipe/modules/palm_detection/palm_detection.tflite /root/flatbuffers/palm_detection.tflite # 移动至flatbuffers目录下
第二步,下载 schema.fbs 档案
此档案须与模组的 TensorFlow 版本相符
$ git clone https://github.com/tensorflow/tensorflow
$ cd /root/tensorflow
$ cp tensorflow/lite/schema/schema.fbs /root/flatbuffers/schema.fbs  # 移动至flatbuffers目录下
第三步,搭建重建函式与架构 API
# (1) 载入必要函式库
import os
import numpy as np
import json
import tensorflow as tf
import shutil
from pathlib import Path

# (2) API config
os.environ['CUDA_VISIBLE_DEVICES'] = '0'
schema = "schema.fbs"
binary = "./flatc"
model_path = "palm_detection.tflite"
output_pb_path = "palm_detection.pb"
output_savedmodel_path = "saved_model"
model_json_path = "palm_detection.json"
output_node_names = [ 'classificators' , 'regressors' ]

#( 3) API : 共三个
# 产生架构档(JSON)
def gen_model_json():
  cmd = (binary + " -t --strict-json --defaults-json -o . {schema} -- {input}".format(input=model_path, schema=schema))
  print("output json command =", cmd)
  os.system(cmd)

# 解析架构
def parse_json():
    j = json.load(open(model_json_path))
    op_types = [ v['builtin_code’] for v in j[ 'operator_codes'] ]
    ops = j['subgraphs'][0]['operators'] # subgraphs => 分为 tensors / inputs / outputs / operators
    return ops, op_types

# 描述架构图
# make_graph 函式内需要撰写 tflite 内所有用到 架构层 layer
# 因此非常庞大 这里仅介绍 conv2 的描述,完整代码请至 “该连结查看”
def make_graph(ops, op_types, interpreter):
    tensors = {}
    input_details = interpreter.get_input_details()
    output_details = interpreter.get_output_details()
    for input_detail in input_details:
        tensors[input_detail['index']] = tf.compat.v1.placeholder(
            dtype=input_detail['dtype'], shape=input_detail['shape'], name=input_detail['name'])

    for index, op in enumerate(ops):
        print('op: ', op)
        op_type = op_types[op['opcode_index']]
        if op_type == 'CONV_2D':
            input_tensor = tensors[op['inputs'][0]]
            weights_detail = interpreter._get_tensor_details(op['inputs'][1])
            bias_detail = interpreter._get_tensor_details(op['inputs'][2])
            output_detail = interpreter._get_tensor_details(op['outputs'][0])
            weights_array = interpreter.get_tensor(weights_detail['index'])
            weights_array = np.transpose(weights_array, (1, 2, 3, 0))
            bias_array = interpreter.get_tensor(bias_detail['index'])
            weights = tf.compat.v1.Variable(weights_array, name=weights_detail['name'])
            bias = tf.compat.v1.Variable(bias_array, name=bias_detail['name'])
            options = op['builtin_options']
            output_tensor = tf.compat.v1.nn.conv2d(
                input_tensor,
                weights,
                strides=[1, options['stride_h'], options['stride_w'], 1],
                padding=options['padding'],
                dilations=[1, options['dilation_h_factor'],options['dilation_w_factor'], 1],
                name=output_detail['name'] + '/conv2d')
            output_tensor = tf.compat.v1.add(output_tensor, bias, name=output_detail['name'])
tensors[output_detail['index']] = output_tensor
第四步,调用 API 进行逆转换
# 将 tf lite 架构转成 json 格式
tf.compat.v1.disable_eager_execution()
gen_model_json()
ops, op_types = parse_json()

# 调用 tflite 取得资讯
interpreter = Interpreter(model_path)
interpreter.allocate_tensors()
input_details = interpreter.get_input_details()
output_details = interpreter.get_output_details()
print(input_details)
print(output_details)

# 将 tf lite 重新拆解回 savedmodel
# 若欲将 tflite 转成全整数的格式,请查阅并结合上一小节方式。
make_graph(ops, op_types, interpreter)
config = tf.compat.v1.ConfigProto()
config.gpu_options.allow_growth = True
graph = tf.compat.v1.get_default_graph()
with tf.compat.v1.Session(config=config, graph=graph) as sess:
  sess.run(tf.compat.v1.global_variables_initializer())
  graph_def = tf.compat.v1.graph_util.convert_variables_to_constants(sess=sess,\
                                                  input_graph_def=graph.as_graph_def(),\
                                                  output_node_names=output_node_names)
  with tf.io.gfile.GFile(output_pb_path, 'wb') as f:
      f.write(graph_def.SerializeToString())
      shutil.rmtree('saved_model', ignore_errors=True)
      tf.compat.v1.saved_model.simple_save(sess,
            output_savedmodel_path,
            inputs={'input': graph.get_tensor_by_name('input:0')},
            outputs={
                'classificators': graph.get_tensor_by_name('classificators:0'),
                'regressors': graph.get_tensor_by_name('regressors:0')
            })
第五步,SavedModel 转换 TensorFlow Lite
# 因担心代码过于冗长,故此代码转成 tflite 格式为主。
import tensorflow as tf
converter = tf.compat.v1.lite.TFLiteConverter.from_saved_model( 'saved_model' )
converter.optimizations = [tf.lite.Optimize.DEFAULT]
converter.target_spec.supported_ops = [tf.compat.v1.lite.OpsSet.TFLITE_BUILTINS_INT8]
converter.inference_input_type  = tf.compat.v1.uint8
converter.inference_output_type = tf.compat.v1.uint8
converter.representative_dataset = representative_dataset_gen # representative_dataset 请参阅上述的量化方式
tflite_model = converter.convert()
with tf.io.gfile.GFile( "/root/palm_detection_uint8.tflite" , 'wb') as f:
   f.write(tflite_model)
print("Integer Quantization complete! ")
※ tips 分享 : 此方式相当费时费工,且因 TensorFlow 版本因素 再次提高转换的实现难度
三. 结语
模组转换是一项相当实用的技术,但取决于各家神经网路框架的版本不同,仍会出现无法转换成功的问题。此章节提供读者一套 TensorFlow Lite 重新拆解的方法,拆解为 SavedModel 后就可以再次转成 ONNX 或是 TensorFlow Lite 的格式。这可以用在纯整数的 AI 芯片上,而 NXP I.MX8MPlus 的 NPU 神经处理单元正好可以适用此项技术,并能帮助读者移植至该平台中实现应用。若有任何模组转换的问题,可以至下方留言所遇到的问题,让我们一起互相切磋,一起成长!! 下一篇文章,将会介绍如何建置 TensorFlow Lite 的物件侦测应用,并应用在 NXP i.MX8M Plus 的平台上。
四. 参考文件
[1] 官方文件 - i.MX Machine Learning User's Guide pdf
[2] 官方文件 - TensorFlow Lite 转换工具
[3] 官方文件 - Post-training quantization
[4] 官方文件 - TensorFlow API
[5] 第三方文件 - Tensorflow模型量化(Quantization)原理及其实现方法
[6] 官方文件 - TensorFlow Lite 现有应用资源
[7] 官方文件 - TensorFlow Lite Hub
[8] 官方文件 - TensorFlow Lite Slim
[9] 官方文件 - TensorFlow Model Garden
[10] 官方文件 - TensorFlow Model JS
[11] 官方文件 - Keras
[12] 官方文件 - TensorFlow - Using the SavedModel Format
[13] 第三方文件 - TensorFlow 模型导出总结
[14] 官方文件 - TensorFlow Model Garden
[15] 官方文件 -Megnta github
[16] 官方文件 - Pytorch
[17] 官方文件 - ONNX
[18] 官方文件 - OpenVINO
[19] 官方文件 - ONNX Model Zoo
[20] 官方文件 - OpenVINO Model Zoo
[21] 官方文件 - YOLO : Real-Time Object Detection
[22] 第三方文件 - @PINTO github 系列
如有任何相关 TensorFlow Lite 进阶技术问题,欢迎至博文底下留言提问 !!
接下来还会分享更多 TensorFlow Lite 进阶的技术文章 !!敬请期待 【ATU Book-i.MX8系列 – TFLite 进阶】 !!

评论