

一. 概述
在边缘运算的重点技术之中,除了简化复杂的模组架构,来简化参数量以提高运算速度的这项模组轻量化网路架构技术之外。另一项技术就是各家神经网路框架 (TensorFlow、Pytorch etc…) 的 模组优化 能力,主要探讨 TensorFlow Lite 的 训练后之量化方式(Post-training quantization) 与 感知量化训练(Quantization-aware Training) ,依序分为上与下两篇幅,本篇将介绍前者资讯为主。所谓的量化就是将以最小精度的方式,来进行模组推理,使模组应用至各种 Edge Device 之中,并达到足够成本效益,如下图所示。顺带一提, 恩智浦 NXP i.MX8M Plus 的 NPU(Neural Processing Unit) 神经处理单元,属于纯整数的 AI 加速器,就仅适用于 8位元的整数运算才能获得最佳效益 !! 此系列的后续章节,也会利用 NPU 来实现算法加速之目的。
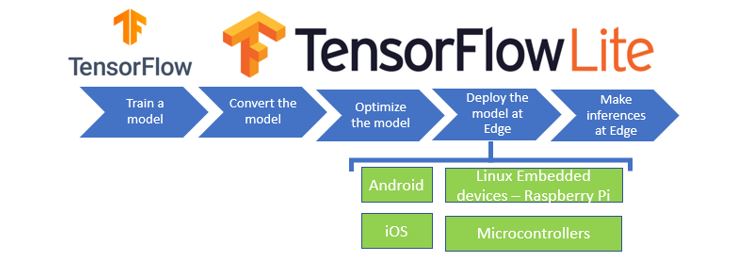
TensorFlow 模型应用概念之示意图
利用 TensorFlow Lite 量化方式 所构成的 模组 ,就是将训练完成的轻量化模组,透过量化与优化的方式来提升推理速度 !! 如下模型运作概念图所示,储存模型完成后,即可依序执行冻结模型、优化模型到最后轻量化模型 (.tflite),让模型运行在移动式装置时可达到最佳化的效果。
※ MobileNet 模组是一种轻量化模组的架构,而此篇重点是如何透过模组量化转换为轻量化模组(tflite)
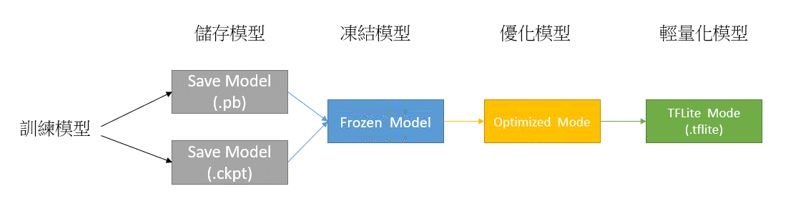
TensorFlow 模型运作概念之示意图
若新读者欲理解更多人工智能、机器学习以及深度学习的资讯,可点选查阅下方博文
大大通精彩博文 【ATU Book-i.MX8系列】博文索引
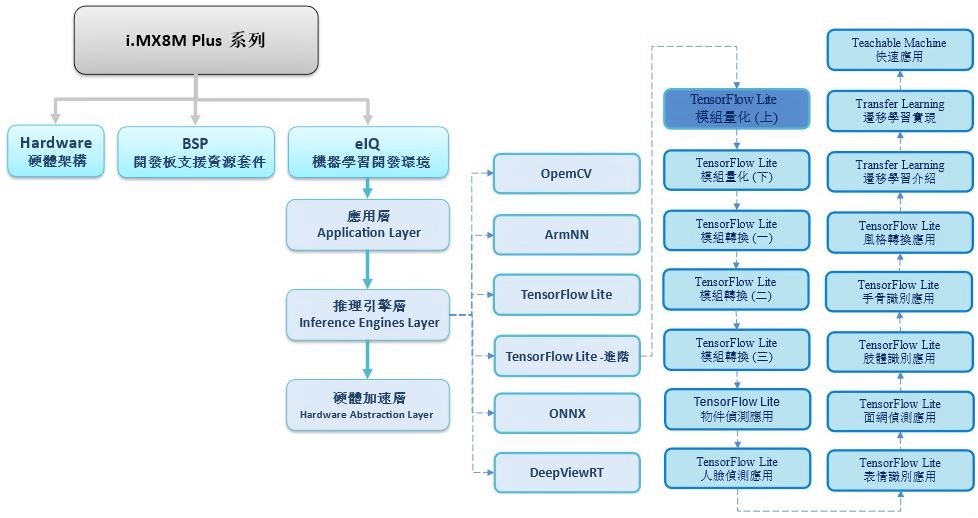
TensorFlow Lite 进阶系列博文-文章架构示意图
二. 量化理论
何谓量化 ? 在此文章是泛指数值程度上的量化,亦指有限范围的数值表示方式。其作用是为了降低数值资料量与模组大小,来提升传输与执行(推理)速度!! 而所谓的训练后之量化(Post-training quantization) 就是利用训练完成的模组,再次进行量化的一种优化方式。主要特色就是仅须要储存后的模组( SaveModel / .h5 /ckpt),且不需要训练时的资料库即可量化。
举例来说,如下图所示,是须将原本数值分布为 -3e38 到 +3e38 的浮点数型态 float,量化为数值分布 -231 到 231 的整数型态 int ,并以原本数据的最大值与最小值来找出有效的数值范围,将有一定概率大幅度减少资料量。
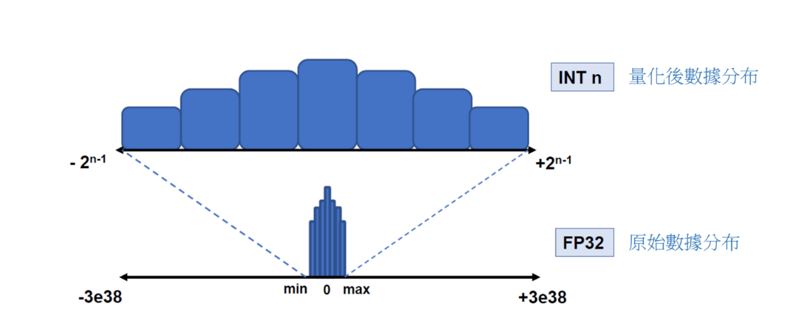
数据量化示意图
如何量化? 下列以最实际公式进行演示
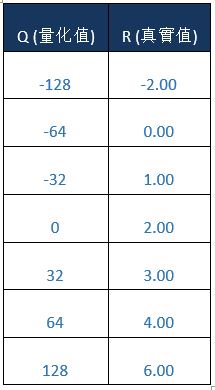
假设原始数值的范围为 [-2 : 6.0] 的浮点表示,将其量化至目标范围 [-128 : 127] 的 8bit 整数范围
第一步,找出量化后能够表示的最小刻度

第二步,找出相对应的量化定点值

第三步,找出相对应的量化定点值

即可找出浮点数为 3.0 时,所对应的量化数值为 32。若将上述量化方式,将浮点数数值范围量化为整数范围,即如同下方表格所示。
量化优势? 劣势 ? 对于 TensorFlow Lite轻量化的应用而言
优势:
- 减少模组尺寸:最多能缩减 75% 的大小
- 加快推理速度 : 使用整数计算大幅度提升速度
- 支援硬体较佳 : 能使处理八位元的处理器进行推理
- 传输速度提升 : 因模组尺寸缩小,能更获得更好的传输品质
缺点 :
- 精度损失 : 因为数值的表示范围缩减,故模组的准确度将会大幅度的降低
三. 训练后之量化(Post-training quantization)
在 TensorFlow 提供的转换过程中,大致上可分成三种量化方式,如下图所示 :
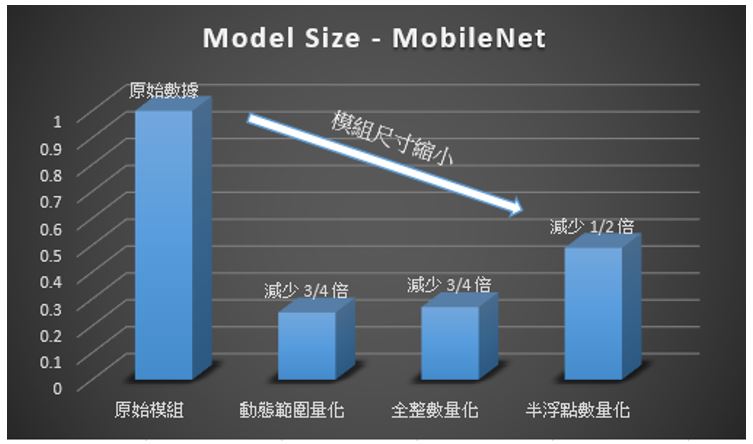
1. 动态范围量化(Dynamic Range Quantify)
该浮点数之 权重(Parameters) 转化整数型态,但部分 激励函数(Activation) 不支持整数化的方式,故会保留部分浮点数权重来保持模组的精确度,而称 "动态范围量化"。
※ 作用 : 模组大小最多可缩小 75 %、推理速度加快 2-3 倍,适用于 CPU 运算。
# Dynamic Range Habrid Quantify Python Code
import tensorflow as tf
import numpy as np
converter = tf.lite.TFLiteConverter.from_saved_model("SavedModel_Path")
converter.optimizations = [tf.lite.Optimize. DEFAULT]
tflite_model = converter.convert()
with tf.io.gfile.GFile( "model.tflite" , 'wb') as f:
   f.write(tflite_model)
print("Quantization complete! - model.tflite ")
2. 半浮点量化(Half-Float Quantify)
该浮点数之 权重(Parameters) 转化 半浮点数型态(float16),保有一定的精度与缩减模组大小,故称"半浮点数量化"。
※ 作用 : 模组大小最多可缩小 50 %、推理速度加快 1 倍,适用于 GPU 运算。
# Half-Float Quantify Python Code
import tensorflow as tf
import numpy as np
converter = tf.lite.TFLiteConverter.from_saved_model("SavedModel_Path")
converter.optimizations = [tf.lite.Optimize.DEFAULT]
converter.target_spec.supported_types = [tf.float16]
with tf.io.gfile.GFile( "model.tflite" , 'wb') as f:
   f.write(tflite_model)
print("Quantization complete! - model.tflite ")
3. 全整数量化(Full Integer Quantify)
该浮点数之 权重(Parameters)、 激励函数(Activation) 皆转化整数型态,且额外建立一个小数据集来保持模组的精确度,而称 "全整数量化"。
※ 作用 : 模组大小最多可缩小 75 %、推理速度加快 3 倍以上,适用于 CPU Edge / TPU / NPU 运算。
快速转换 - 代码 :
# Full Integer Quantify Python Code
import tensorflow as tf
import numpy as np

# 建立模拟数据集 (已乱随构成的测试集会影像精准度)
def representative_dataset_gen():
    for _ in range(250):
        yield [np.random.uniform(0.0, 1.0, size=(1, H,W, C)).astype(np.float32)] # H,W,C 为模组所须输入的影像大小

# 量化转换
converter = tf.lite.TFLiteConverter.from_saved_model(“SavedModel Path”)
converter.optimizations = [tf.lite.Optimize.DEFAULT]
converter.target_spec.supported_ops = [tf.lite.OpsSet.TFLITE_BUILTINS_INT8]
converter.inference_input_type  = tf.uint8
converter.inference_output_type = tf.uint8
converter.representative_dataset = representative_dataset_gen
tflite_model = converter.convert()
with open("model.tflite",'wb') as f:
    f.write(tflite_model)
print("tranfer done!!")
补充说明 :
(1) TFLiteConverter 支援模组格式 ( Keras / SavedModel / Function / Session / Frozen Graph ) : link
(2) TFLiteConverter 官方介绍 : link
(3) 若碰到两个以上的输入端时,须将representative_dataset_gen 输出改成类似 yield [ data1, data2 ]
(4) 若欲想更改输入端的大小,则可以尝试用 from_concrete_functions 进行转换
这里,必须要强调 TensorFlow Lite 在转换过程中所用的数据集的重要性 !! 如同上述代码中的数据集描述 representative_dataset_gen() ,而该代码之所以为简单快速是因为无须考虑原始来源的数据集,利用随机产生的资料即转换成轻量化模型(.tflite),但这有可能大幅度影响准确度。这是因为在 TensorFlow 进行转换的过程中,会提取数据集之中的资料进行微调或小批的再训练,将会导致前后结果之间的权重数值。因此,若用于精度需求比较高的模组时,强烈建议拿原始训练集或测试集进行转换。掌握这个重点,将能在整数的 TensorFlow Lite 转换上有显著的帮助!! 如同以下代码 :
准确转换 - 代码 :
# 建立 keras 资料集train_ds = tf.keras.preprocessing.image_dataset_from_directory("your data",batch_size=1, color_mode='rgb', image_size=(192, 192))
# 建立由数张影像资料(从keras 资料集取出)所建构的 list 结构
num = 0
images = []
for image_batch, labels_batch in train_ds:
num = num +1
images.append(image_batch[0])
if num == 250:print(num);break
# 建立真实数据集 (建议使用, 能提高精准度)
# Full Integer Quantify Python Code
import tensorflow as tf
import numpy as np
def representative_dataset_gen():
for data in tf.data.Dataset.from_tensor_slices((images)).batch(1).take(100):
yield [tf.dtypes.cast(data, tf.float32)]
# 量化转换
converter = tf.lite.TFLiteConverter.from_saved_model(“SavedModel Path”)
converter.optimizations = [tf.lite.Optimize.DEFAULT]
converter.target_spec.supported_ops = [tf.lite.OpsSet.TFLITE_BUILTINS_INT8]
converter.inference_input_type = tf.uint8
converter.inference_output_type = tf.uint8
converter.representative_dataset = representative_dataset_gen
tflite_model = converter.convert()
with open(TFliteModel,'wb') as f:
f.write(tflite_model)
print("tranfer done!!")
4. 量化方式技巧
TensorFlow Lite 量化方式可分作动态范围量化、全整数量化、半浮点数量化三种。
为了支持不同的模组格式 (如 .h5 , pb) 与 TensorFlow 1.x /2.x 版本,官方提供数种转换方式…
※ 测试版本为 TensorFlow 2.4.0 & TensorFlow 1.5.0,若欲了解更多模组转换,请至下一章节查阅。
TensorFlow 1.x 支援之转换格式
# (1) Saved Model
# TensorFlow Lite Converter ( savemodel to .tflite )
import tensorflow as tf
converter = tf.compat.v1.lite.TFLiteConverter.from_saved_mode( "savedmodel_path" )
converter.optimizations = [tf.lite.Optimize.DEFAULT]
tflite_model = converter.convert()
with tf.io.gfile.GFile( "model.tflite" , 'wb') as f:
   f.write(tflite_model)
print("tranfer done!!")
# (2) Keras ( .h5 file)
# TensorFlow Lite Converter ( .h5 to .tflite )
import tensorflow as tf
converter = tf.compat.v1.lite.TFLiteConverter.from_keras_model_file("model.h5")
converter.optimizations = [tf.lite.Optimize.DEFAULT]
tflite_model = converter.convert()
with tf.io.gfile.GFile( "model.tflite" , 'wb') as f:
   f.write(tflite_model)
print("tranfer done!!")
# (3) ckpt (.ckpt file)
# TensorFlow Lite Converter ( .ckpt to .tflite )
import tensorflow as tf
from src import transform # 读取模组架构
g = tf.compat.v1.Graph()
soft_config = tf.compat.v1.ConfigProto(allow_soft_placement=True)
soft_config.gpu_options.allow_growth = True
with g.as_default(), tf.compat.v1.Session(config=soft_config) as sess:
  img_placeholder = tf.compat.v1.placeholder(tf.float32, shape=[1, 474, 712, 3], name='img_placeholder') #输入端节点(Netron 查看)
  preds = transform.net(img_placeholder) # 输出端节点 ( Netron 查看 )
  saver = tf.compat.v1.train.Saver()
  saver.restore(sess, "model.ckpt" ) # ckpt file
  converter = tf.compat.v1.lite.TFLiteConverter.from_session(sess, [img_placeholder], [preds])
  converter.optimizations = [tf.lite.Optimize.DEFAULT]
  tflite_model = converter.convert()
  with tf.io.gfile.GFile( "model.tflite", 'wb') as f:
    f.write(tflite_model)
  print("tranfer done!!")
# (4) Frozen Graph (.pb file)
# TensorFlow Lite Converter ( .pb to .tflite )
import tensorflow as tf
tf.compat.v1.enable_eager_execution()
# Weight Quantization - Input/Output=float32
input_arrays=["normalized_input_image_tensor"]
output_arrays=['TFLite_Detection_PostProcess','TFLite_Detection_PostProcess:1',
               'TFLite_Detection_PostProcess:2','TFLite_Detection_PostProcess:3']
input_tensor={"normalized_input_image_tensor":[1,300,300,3]}
converter = tf.lite.TFLiteConverter.from_frozen_graph("model.pb", input_arrays,output_arrays,input_tensor)
converter.optimizations = [tf.lite.Optimize.OPTIMIZE_FOR_SIZE]
converter.allow_custom_ops = True
tflite_quant_model = converter.convert()
with open('model.tflite', 'wb') as w:
    w.write(tflite_quant_model)
print("tranfer done!!")
TensorFlow 2.x 支援之转换格式
# (1) Saved Model
# TensorFlow Lite Converter ( savemodel to .tflite )
import tensorflow as tf
import numpy as np
converter = tf.lite.TFLiteConverter.from_saved_model("SavedModel_Path")
converter.optimizations = [tf.lite.Optimize. DEFAULT]
tflite_model = converter.convert()
with tf.io.gfile.GFile( "model.tflite" , 'wb') as f:
   f.write(tflite_model)
print("Quantization complete! - model.tflite ")
# (2) Keras
# TensorFlow Lite Converter ( .h5 to .tflite )
import tensorflow as tf
import numpy as np
model = tf.keras.models.load_model( "model.h5" )
converter = tf.lite.TFLiteConverter.from_keras_model( model )
converter.optimizations = [tf.lite.Optimize. DEFAULT]
tflite_model = converter.convert()
with tf.io.gfile.GFile( "model.tflite" , 'wb') as f:
   f.write(tflite_model)
print("Quantization complete! - model.tflite ")
# (3) function
# TensorFlow Lite Converter ( func to .tflite )
import tensorflow as tf
import numpy as np
model = tf.saved_model.load( "savedmodel" )
concrete_func = model.signatures[ "serving_default " ]
concrete_func.inputs[0].set_shape([1, 256, 256, 3])
converter = tf.lite.TFLiteConverter.from_concrete_functions([concrete_func])
converter.optimizations = [tf.lite.Optimize. DEFAULT]
tflite_model = converter.convert()
with tf.io.gfile.GFile( "model.tflite" , 'wb') as f:
   f.write(tflite_model)
print("Quantization complete! - model.tflite ")
四. 结语
本文介绍了 TensorFlow 训练后的量化,来实现如何将各种 TenosrFlow 的模组量化为轻量化模组 (.tflite) 的方式。这种量化方式分为三种用法,依序为动态范围量化、半浮点量化、全整数量化。且能够在不给予参考的数据条件下,快速达到量化之目的。但若需要提升准确度时,则可以用原生的数据集来达到更高准确度的模型结果 !! 对于现今热门的边缘运算环境与整数类型的 AI 加速器而言,可谓是必经的一道优化程序 !! 接下来,将会介绍另一个官方所推荐的量化方式 - 感知量化训练 ,敬请期待 !!
五. 参考文件
[1] 官方文件 - i.MX Machine Learning User's Guide pdf
[2] 官方文件 - TensorFlow Lite 转换工具
[3] 官方文件 - Post-training quantization
[4] 官方文件 - TensorFlow API
[5] 第三方文件 - Tensorflow模型量化(Quantization)原理及其实现方法
如有任何相关 TensorFlow Lite 进阶技术问题,欢迎至博文底下留言提问 !!
接下来还会分享更多 TensorFlow Lite 进阶文章 !!敬请期待 【ATU Book-i.MX8系列 – TFLite 进阶】 !!

评论