

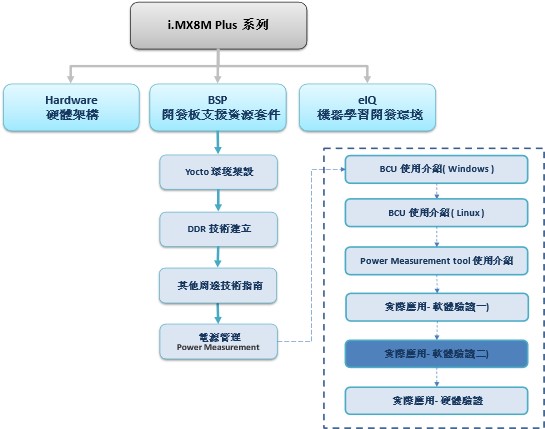
一. 概述
本篇章将介绍恩智浦原厂所提供一套电源管理套件,能够透过软体远端操作的方式,进行电压、电流等量测。能够帮助用户快速取得芯片中各脚位的电源状态 !! 非常便利 !! 但此套件需要搭配特定的电源量测芯片 “PAC1934” 才能运行,故仅支援特定型号的芯片,如下所示。

BCU 套件支援的特定芯片与 EVM 型号示意图
其中,在这系列所提供的电源管理套件,可以细分成 Board Remote Control Utilities (BCU) 与 Power Measurement tool (PMT) 两个套件,前者提供主要的远端操作技术,后者则是将 BCU 整合 GUI,使得界面变得更强大。然而,后续章节将会介绍几种“使用场景”,读者仅需要依照各应用场景的步骤操作,并使用 BCU 或 PMT 来测量电压即可。在每一个场景中,将会提供原厂的标准电压数据,请测量完数据后,进行比对。故此章节将从 实际应用 - 软体验证(二) 来分享操作。
大大通精彩博文 【ATU Book-i.MX8系列】博文索引
Power Measurement 系列博文-文章架构示意图
二. Power Measurement Tool (PMT)
Power Measurements 顾名思义就是电源量测,此章节将结合 BCU 或 PMT 两个软体,来测量各样的应用分析的电源数据,比如说使用 NPU / GPU 使用的耗电量测、双镜头的耗电量测等等。
环境操作 i.MX8M PLUS EVK , BSP L5.15.71
1. 测量方式
开发板搭载 PAC1934 的电源量测芯片,结合既有的电阻元件资讯,即可透过 BCU 与 PMT 工具来量测各个节点之间的电压、电流、功率等等。其中能检测的节点,如下 PMIC 所量测的各节点电压之示意图 所示。
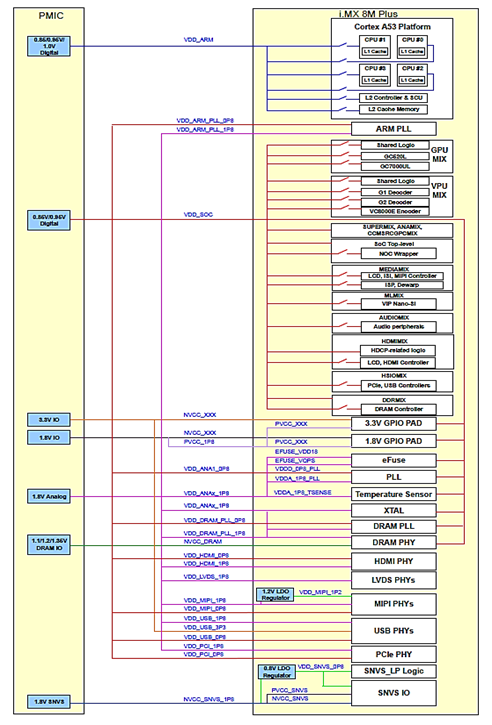
图文来源 : i.MX 8M Plus Power Consumption Measurement
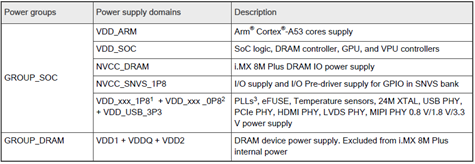
(1) 各电压节点名词解释 :
图文来源 : i.MX 8M Plus Power Consumption Measurement
(2) 各电压节点,在不同模式的电源状态 :
共 Nominal mode / Overdrive mode / Super Overdrive mode 三种模式。
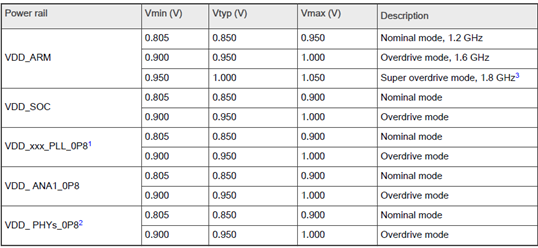
图文来源 : i.MX 8M Plus Power Consumption Measurement
(3) 测量项目 :
◆ CPU ( ARM ) 电压、电流。
◆ DRAM、LPDDR4 电压、电流。
◆ System 电压、电流。
◆ SoC 电压、电流。
◆ SD Card 电压、电流。
◆ LVDS、HDMI 电压、电流。
◆ USB、PCI、MIPI 电压、电流。
2. 使用场景
以下实验请连接萤幕与网路进行操作,设定完成场景后,请使用 BCU 或 PMT 测量电源。
因测量电压、电流数据繁多,将不易于图形呈现,故以 csv 档案呈现,还请读者自行比对数据,谢谢。
(1) Heavy Load use cases
视频解码 (VPU)
操作方式 :
$ bash setup_video.sh
#!/bin/bash
export WL_EGL_SWAP_INTERVAL=0
cpufreq-set -g performance
partitions=`lsblk |awk '$1 !~/-/{print $1}' |grep 'blk2boot\|sd'`
for partition in $partitions; do
echo 512 > /sys/block/$partition/queue/read_ahead_kb
done
ifconfig eth0 down
ifconfig eth1 down
echo 1 > /sys/class/graphics/fb0/blank
echo 0 > /sys/class/graphics/fb0/blank
$ bash vpu_g2dec.sh
EXT_LOOP=10000
FILE=HEVC_1920x1080_29.97fps_AACLC_44.1Khz_2ch.mkv
export LD_LIBRARY_PATH=/unit_tests/VPU/hantro/:$LD_LIBRARY_PATH
while true;do
cnt=1
while [ $cnt -le $EXT_LOOP ]
do
/unit_tests/VPU/hantro/g2dec -P -Ers -ibs -N200 -X -b $FILE
cnt=$(($cnt+1));
done
done
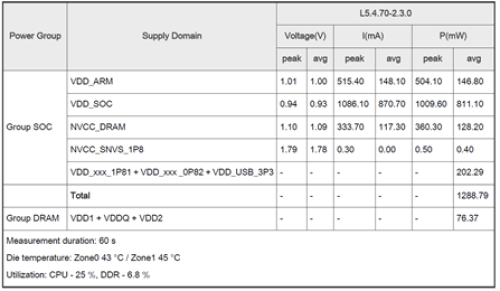
测量数据 :
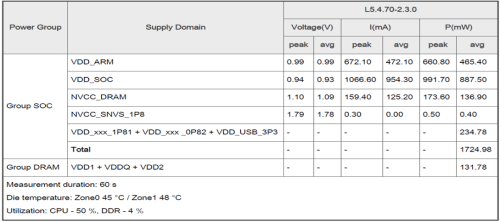
图文来源 : i.MX 8M Plus Power Consumption Measurement
测试结果 : 请查阅
Coremark + GLmark 测试程式
操作方式 :
$ bash setup_video.sh
#!/bin/bash
export WL_EGL_SWAP_INTERVAL=0
cpufreq-set -g performance
partitions=`lsblk |awk '$1 !~/-/{print $1}' |grep 'blk2boot\|sd'`
for partition in $partitions; do
echo 512 > /sys/block/$partition/queue/read_ahead_kb
done
ifconfig eth0 down
ifconfig eth1 down
echo 1 > /sys/class/graphics/fb0/blank
echo 0 > /sys/class/graphics/fb0/blank
$ bash Coremark_loop.sh
while true; do
./Coremark.exe > /dev/null 2>&1
done
$ bash gpu_glmark.sh
while true;do
glmark2-es2-wayland --fullscreen
done
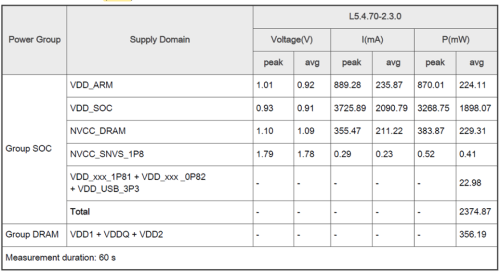
测量数据 :
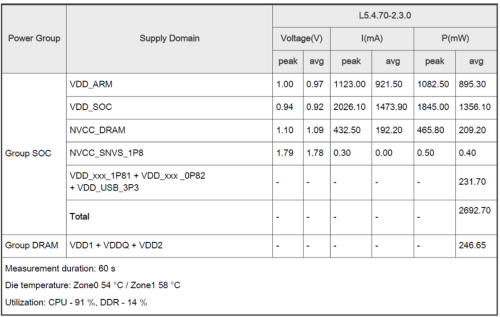
图文来源 : i.MX 8M Plus Power Consumption Measurement
测试结果 : 请查阅
(2) Memory
记忆体设置( Memset )
操作方式 :
$ bash setup.sh
#!/bin/bash
systemctl stop weston.service
cpufreq-set -g performance
echo 1 > /sys/class/graphics/fb0/blank
partitions=`lsblk |awk '$1 !~/-/{print $1}' |grep 'blk\|sd'`
for partition in $partitions; do
echo 512 > /sys/block/$partition/queue/read_ahead_kb
done
ifconfig eth0 down
ifconfig eth1 down
$ bash memset_loop.sh
while true; do
perf bench -f simple mem memset -l10000 -s 1024MB
done
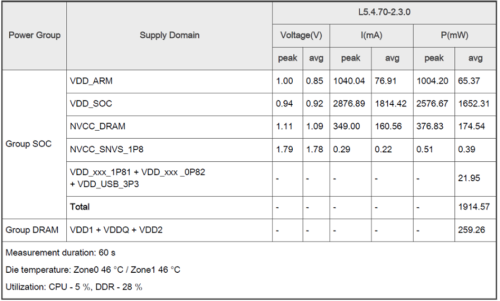
测量数据 :
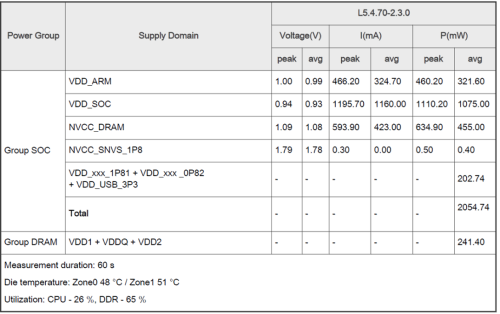
图文来源 : i.MX 8M Plus Power Consumption Measurement
测试结果 : 请查阅
记忆体复制( Memcpy )
操作方式 :
$ bash setup.sh
#!/bin/bash
systemctl stop weston.service
cpufreq-set -g performance
echo 1 > /sys/class/graphics/fb0/blank
partitions=`lsblk |awk '$1 !~/-/{print $1}' |grep 'blk\|sd'`
for partition in $partitions; do
echo 512 > /sys/block/$partition/queue/read_ahead_kb
done
ifconfig eth0 down
ifconfig eth1 down
$ bash memcpy_loop.sh
while true; do
perf bench -f simple mem memcpy -l10000 -s 1024MB
done
测量数据 :
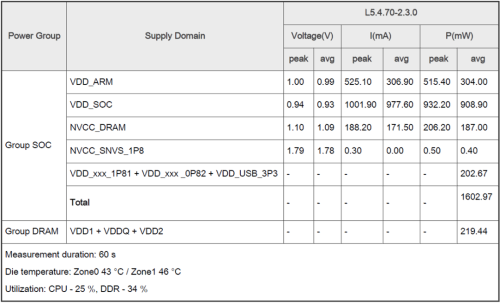
图文来源 : i.MX 8M Plus Power Consumption Measurement
测试结果 : 请查阅
(3) SD Card
读取测试( DD_RD_SDCARD )
操作方式 :
$ bash setup.sh
#!/bin/bashsystemctl stop weston.service
cpufreq-set -g performance
echo 1 > /sys/class/graphics/fb0/blank
partitions=`lsblk |awk '$1 !~/-/{print $1}' |grep 'blk\|sd'`
for partition in $partitions; do
echo 512 > /sys/block/$partition/queue/read_ahead_kb
done
ifconfig eth0 down
ifconfig eth1 down
$ bash dd_read_SD10.sh
#!/bin/bash
# Since we're dealing with dd, abort if any errors occur
set -e
TEST_FILE=${1:-dd_ibs_testfile}
if [ $EUID -ne 0 ]; then
echo "NOTE: Kernel cache will not be cleared between tests without sudo. This will likely cause
inaccurate results." 1>&2
fi
# Create a test file
# Header
PRINTF_FORMAT="%8s : %s\n"
printf "$PRINTF_FORMAT" 'block size' 'transfer rate'
# Block sizes of 512b 1K 2K 4K 8K 16K 32K 64K 128K 256K 512K 1M 2M 4M 8M 16M 32M 64M
for BLOCK_SIZE in 512 1024 2048 4096 8192 16384 32768 65536 131072 262144 524288 1048576 2097152
4194304 8388608 16777216 33554432 67108864
do
# Clear kernel cache to ensure more accurate test
[ $EUID -eq 0 ] && [ -e /proc/sys/vm/drop_caches ] && echo 3 > /proc/sys/vm/drop_caches
# Read test file out to /dev/null with specified block size
DD_RESULT=$(dd if=$TEST_FILE of=/dev/null bs=$BLOCK_SIZE 2>&1 1>/dev/null)
# Extract transfer rate
TRANSFER_RATE=$(echo $DD_RESULT | \grep --only-matching -E '[0-9.]+ ([MGk]?B|bytes)/s(ec)?')
printf "$PRINTF_FORMAT" "$BLOCK_SIZE" "$TRANSFER_RATE"
done
测量数据 :
图文来源 : i.MX 8M Plus Power Consumption Measurement
测试结果 : 请查阅
写入测试( DD_WRT_SDCARD )
操作方式 :
$ bash setup.sh
#!/bin/bash
systemctl stop weston.service
cpufreq-set -g performance
echo 1 > /sys/class/graphics/fb0/blank
partitions=`lsblk |awk '$1 !~/-/{print $1}' |grep 'blk\|sd'`
for partition in $partitions; do
echo 512 > /sys/block/$partition/queue/read_ahead_kb
done
ifconfig eth0 down
ifconfig eth1 down
$ bash dd_write_SD10.sh
#!/bin/bash
# Since we're dealing with dd, abort if any errors occur
set -e
TEST_FILE=${1:-dd_obs_testfile}
TEST_FILE_EXISTS=0
if [ -e "$TEST_FILE" ]; then TEST_FILE_EXISTS=1; fi
TEST_FILE_SIZE=3221225472
if [ $EUID -ne 0 ]; then
echo "NOTE: Kernel cache will not be cleared between tests without sudo. This will likely cause
inaccurate results." 1>&2
fi
# Header
PRINTF_FORMAT="%8s : %s\n"
printf "$PRINTF_FORMAT" 'block size' 'transfer rate'
# Block sizes of 512b 1K 2K 4K 8K 16K 32K 64K 128K 256K 512K 1M 2M 4M 8M 16M 32M 64M
for BLOCK_SIZE in 512 1024 2048 4096 8192 16384 32768 65536 131072 262144 524288 1048576 2097152
4194304 8388608 16777216 33554432 67108864
do
# Calculate number of segments required to copy
COUNT=$(($TEST_FILE_SIZE / $BLOCK_SIZE))
if [ $COUNT -le 0 ]; then
echo "Block size of $BLOCK_SIZE estimated to require $COUNT blocks, aborting further tests."
break
fi
# Clear kernel cache to ensure more accurate test
[ $EUID -eq 0 ] && [ -e /proc/sys/vm/drop_caches ] && echo 3 > /proc/sys/vm/drop_caches
# Create a test file with the specified block size
DD_RESULT=$(dd if=/dev/zero of=$TEST_FILE bs=$BLOCK_SIZE count=$COUNT conv=fsync 2>&1 1>/dev/null)
# Extract the transfer rate from dd's STDERR output
TRANSFER_RATE=$(echo $DD_RESULT | \grep --only-matching -E '[0-9.]+ ([MGk]?B|bytes)/s(ec)?')
## Clean up the test file if we created one
# Output the result
printf "$PRINTF_FORMAT" "$BLOCK_SIZE" "$TRANSFER_RATE"
done
测量数据 :

图文来源 : i.MX 8M Plus Power Consumption Measurement
测试结果 : 请查阅
(4) Product use case
Machine vision (1xISP)
操作方式 :
$ bash coremark_cpu_limit.sh 50
#!/bin/bash
while true; do
./coremark.exe &
pid=$!
taskset -cp 3 $pid
./cpulimit -l $1 -p $pid
done
$ bash ML.sh
#!/bin/bash
rep=$1
cd /usr/bin/tensorflow-lite-2.3.1/examples
for i in $( eval echo {1..$rep} )
do
/usr/bin/tensorflow-lite-2.3.1/examples/benchmark_model --
graph=mobilenet_v1_1.0_224_quant.tflite --num_runs=22000 --use_nnapi=true &
done
运行 GStreamer 范例程式 ( 1080p w/ ISP , HEVC encode ) :
$ gst-launch-1.0 v4l2src device=/dev/video3 ! imxvideoconvert_g2d ! "video/x-raw,width=640,height=480,framerate=30/1"! vpuenc_hevc qos=false ! mpegtsmux ! filesink location=./test_h265.ts
测量数据 :
图文来源 : i.MX 8M Plus Power Consumption Measurement
测试结果 : 请查阅
eIQ Benchmarking tests
操作方式 :
$ /usr/bin/tensorflow-lite-2.3.1/examples/ML.sh
#!/bin/bash
cd /usr/bin/tensorflow-lite-2.9.1/examples
/usr/bin/tensorflow-lite-2.9.1/examples/benchmark_model --graph=mobilenet_v1_1.0_224_quant.tflite --num_runs=22000 --use_nnapi=true &
测量数据 :
图文来源 : i.MX 8M Plus Power Consumption Measurement
测试结果 : 请查阅
三. 结语
如同上一章节所述,这里复刻了原厂所提供的应用场景,读者仅须要输入相应的指令操作即可复现。并可以搭配 BCU 或 PMT 工具的结果来比对当前电压电流数据与原厂提供的标准数据是否相符。同时,作者也分享数个实际测试的数据,有兴趣的读者可以点选连结来查阅比对数据。下一篇,将由专业的硬体工程师来介绍 “实际应用 - 硬体验证”。敬请期待 !!
四. 参考文件
[1] 官方文件 - Board Remote Control Utilities (BCU) Release Notes
[2] 官方文件 - BCU 原始代码
[3] 官方文件 - i.MX 8M Plus Power Consumption Measurement
[4] 官方文件 - i.MX 8M Plus Power Measurement Board User's Guide
[5] 官方文件 - i.MX 8M Plus Power Consumption Measurement
[6] 官方文件 – PMT 原始代码
如有任何相关 Power Measurement 进阶技术问题,欢迎至博文底下留言提问 !!
接下来还会分享更多技术文章 !!敬请期待 【ATU Book-i.MX8系列 – Power Measurement】 !!

评论